SSM

Would you like to react to this message? Create an account in a few clicks or log in to continue.

+5
skyhigh
David
bcauchi
Ray
Magal
9 posters

    WIP - close to finishing my flammpanzer project.

    Magal
    Magal
    Commended
    Commended


    Posts : 65
    Join date : 2011-03-10
    Age : 60
    Location : Malta

    WIP - close to finishing my flammpanzer project. Empty WIP - close to finishing my flammpanzer project.

    Post  Magal Sun Apr 27, 2014 11:46 pm

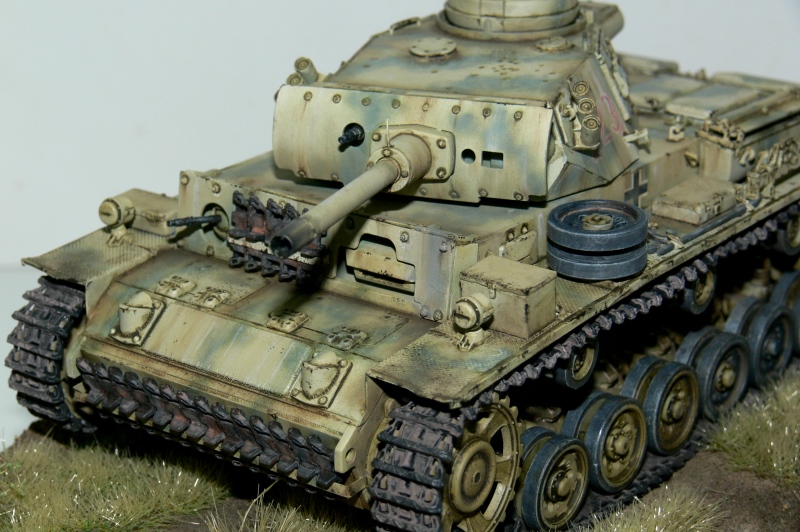
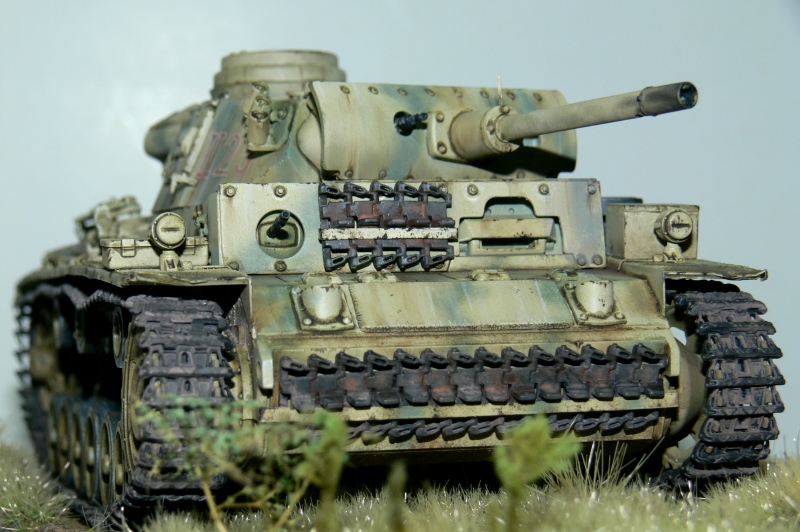
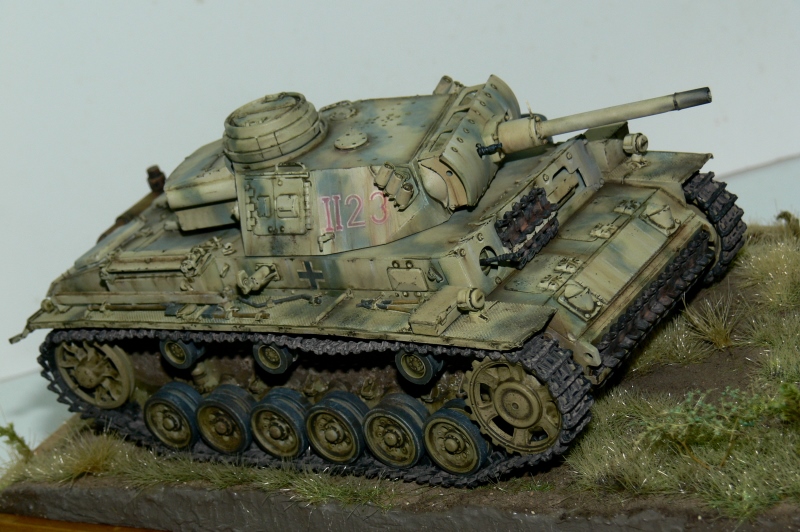
    I bought this Italeri kit at the exhibition and plunged into its construction almost immediately - to think that I've tens of tank kits [including two pz III's], awaiting their turn for years and years.
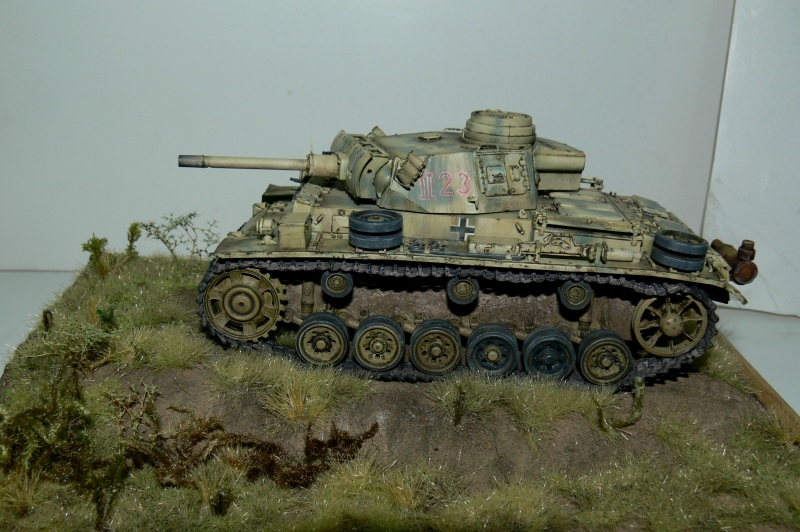
    Anyway, I constructed this kit OOB except for some minor detailing such as brackets and latches that were made out of tin foil strips and bent wire strands.
    Base frame and ground work were done over this weekend [starting Friday] and all that's left now is a touch of pigments on the running gear and some earth thrown about by the tracks. Of course I'll be adding three squaddies for close support.

    Comments and critique welcome; thanks for watching.
    WIP - close to finishing my flammpanzer project. P1140613

    WIP - close to finishing my flammpanzer project. P1140614

    WIP - close to finishing my flammpanzer project. P1140615
    WIP - close to finishing my flammpanzer project. P1140616
    Ray
    Ray
    Best in Show
    Best in Show


    Posts : 6102
    Join date : 2009-07-21
    Age : 60
    Location : Zurrieq MALTA

    WIP - close to finishing my flammpanzer project. Empty Re: WIP - close to finishing my flammpanzer project.

    Post  Ray Mon Apr 28, 2014 12:23 am

    Looks great to me mate  cheers cheers cheers 
    bcauchi
    bcauchi
    Best in Show
    Best in Show


    Posts : 4088
    Join date : 2009-07-30
    Age : 63
    Location : St. Julian's

    WIP - close to finishing my flammpanzer project. Empty Re: WIP - close to finishing my flammpanzer project.

    Post  bcauchi Mon Apr 28, 2014 5:48 am

    Exceptional work!!
    Magal
    Magal
    Commended
    Commended


    Posts : 65
    Join date : 2011-03-10
    Age : 60
    Location : Malta

    WIP - close to finishing my flammpanzer project. Empty Re: WIP - close to finishing my flammpanzer project.

    Post  Magal Mon Apr 28, 2014 7:21 am

    Small lapsus - kit is actually from Revell - excellent in fiit and detail but with very confounding instructions.
    David
    David
    Silver
    Silver


    Posts : 421
    Join date : 2009-07-22
    Age : 62

    WIP - close to finishing my flammpanzer project. Empty Re: WIP - close to finishing my flammpanzer project.

    Post  David Mon Apr 28, 2014 9:11 pm

    Ground work compliments very well with the weathering

    D
    skyhigh
    skyhigh
    Best in Show
    Best in Show


    Posts : 4654
    Join date : 2009-07-30
    Age : 62
    Location : Qormi, Malta

    WIP - close to finishing my flammpanzer project. Empty Re: WIP - close to finishing my flammpanzer project.

    Post  skyhigh Mon Apr 28, 2014 9:20 pm

    Nice work Mark.. cheers 
    Noel Petroni
    Noel Petroni
    Gold
    Gold


    Posts : 1232
    Join date : 2009-07-21
    Age : 62
    Location : Balzan - Malta

    WIP - close to finishing my flammpanzer project. Empty Re: WIP - close to finishing my flammpanzer project.

    Post  Noel Petroni Tue Apr 29, 2014 6:32 am

    I like everything about it!... spray job, weathering...etrc

    Well done!
    Carius
    Carius
    Highly Commended
    Highly Commended


    Posts : 111
    Join date : 2014-04-09
    Location : South of Brazil

    WIP - close to finishing my flammpanzer project. Empty Re: WIP - close to finishing my flammpanzer project.

    Post  Carius Tue Apr 29, 2014 2:50 pm

    Excellent!!!!

    Weathering like a real tank.

    Magal
    Magal
    Commended
    Commended


    Posts : 65
    Join date : 2011-03-10
    Age : 60
    Location : Malta

    WIP - close to finishing my flammpanzer project. Empty Re: WIP - close to finishing my flammpanzer project.

    Post  Magal Tue Apr 29, 2014 7:09 pm

    Thanks for the comments folks. Just arrived in the desert,so it will be at least another four weeks before I resume working on this one. I'm thinking of placing three figures in the foreground on the LHS of the tank and as indicated above, adding the finishing touches to the groundwork.
    Speaking of groundwork, its worth mentioning that on this vignette, I used different sized static grass which I fixed to the 'ground' using my DIY applicator. The difference this makes is astounding; the results are considerably more realistic than just sticking on the grass as I used to do before.
    Ray
    Ray
    Best in Show
    Best in Show


    Posts : 6102
    Join date : 2009-07-21
    Age : 60
    Location : Zurrieq MALTA

    WIP - close to finishing my flammpanzer project. Empty Re: WIP - close to finishing my flammpanzer project.

    Post  Ray Wed Apr 30, 2014 8:55 am

    Keep Safe bro pale 

    Gear up for a retake of your tutorial on tape (hopefully) when you get safely back PLEASE PLEASE PLEASE  cheers
    in nannu pec
    in nannu pec
    Best in Show
    Best in Show


    Posts : 2019
    Join date : 2009-07-23
    Age : 75
    Location : Qawra Malta

    WIP - close to finishing my flammpanzer project. Empty Re: WIP - close to finishing my flammpanzer project.

    Post  in nannu pec Thu May 01, 2014 7:28 am

    Awesome work.....
    In nannu
    alexbb
    alexbb
    Best in Show
    Best in Show


    Posts : 1710
    Join date : 2009-07-21
    Age : 63

    WIP - close to finishing my flammpanzer project. Empty Re: WIP - close to finishing my flammpanzer project.

    Post  alexbb Thu May 01, 2014 8:56 am

    Magal wrote:Thanks for the comments folks. Just arrived in the desert,so it will be at least another four weeks before I resume working on this one. I'm thinking of placing three figures in the foreground on the LHS of the tank and as indicated above, adding the finishing touches to the groundwork.
    Speaking of groundwork, its worth mentioning that on this vignette, I used different sized static grass which I fixed to the 'ground' using my DIY applicator. The difference this makes is astounding; the results are considerably more realistic than just sticking on the grass as I used to do before.


    love your work. btw how about a step by step article on how you built your diy applicator as it looks like it works perfectly.
    Ray
    Ray
    Best in Show
    Best in Show


    Posts : 6102
    Join date : 2009-07-21
    Age : 60
    Location : Zurrieq MALTA

    WIP - close to finishing my flammpanzer project. Empty Re: WIP - close to finishing my flammpanzer project.

    Post  Ray Thu May 01, 2014 2:36 pm

    alexbb wrote:
    Magal wrote:Thanks for the comments folks. Just arrived in the desert,so it will be at least another four weeks before I resume working on this one. I'm thinking of placing three figures in the foreground on the LHS of the tank and as indicated above, adding the finishing touches to the groundwork.
    Speaking of groundwork, its worth mentioning that on this vignette, I used different sized static grass which I fixed to the 'ground' using my DIY applicator. The difference this makes is astounding; the results are considerably more realistic than just sticking on the grass as I used to do before.


    love your work. btw how about a step by step article on how you built your diy applicator as it looks like it works perfectly.

    Yes A.B.B. wise question  Twisted Evil Twisted Evil Twisted Evil 
    Magal
    Magal
    Commended
    Commended


    Posts : 65
    Join date : 2011-03-10
    Age : 60
    Location : Malta

    WIP - close to finishing my flammpanzer project. Empty Re: WIP - close to finishing my flammpanzer project.

    Post  Magal Thu May 01, 2014 3:18 pm

    alexbb wrote:
    Magal wrote:Thanks for the comments folks. Just arrived in the desert,so it will be at least another four weeks before I resume working on this one. I'm thinking of placing three figures in the foreground on the LHS of the tank and as indicated above, adding the finishing touches to the groundwork.
    Speaking of groundwork, its worth mentioning that on this vignette, I used different sized static grass which I fixed to the 'ground' using my DIY applicator. The difference this makes is astounding; the results are considerably more realistic than just sticking on the grass as I used to do before.


    love your work. btw how about a step by step article on how you built your diy applicator as it looks like it works perfectly.

    All that's needed is an electronic flyswatter [€4.5 from homemate] and a metal strainer or sieve. In my case, instead of a strainer I used a herbs dispenser which my missus had bought from a kitchen ware store.
    WIP - close to finishing my flammpanzer project. Downlo10

    1. Cut out the swatter net and surrounding frame.  This leaves you with two free terminals at the output end of the circuit board.

    2. Solder on two wires - one for the negative about 40 cm long and the other [positive] just about 3 cm. WIP - close to finishing my flammpanzer project. Grass-10

    3. fit the strainer seculely in place of the nets and solder or crimp the positive lead to it.

    4. At the free end of the negative lead, attach an insulated croc clip.

    Close up the handle and the contraption should be ready for action, looking something like this
    WIP - close to finishing my flammpanzer project. Dsc_0010
    As I said above, instead of a sieve, I used a metal dispenser can but the function is all the same.
    If you encounter any problems with this project, I'll be available to help out when I return home towards the end of May

    Sponsored content


    WIP - close to finishing my flammpanzer project. Empty Re: WIP - close to finishing my flammpanzer project.

    Post  Sponsored content


      Current date/time is Fri Apr 26, 2024 10:37 am