SSM

Would you like to react to this message? Create an account in a few clicks or log in to continue.

+17
olivermifsud
Gordon
iCocker
William
Aldo
bcauchi
Proximo41
Tancred
David
skyhigh
Joseph
Ray
alexbb
Noel Petroni
Alex Kontiveis
Dottore
in nannu pec
21 posters

    Step by Step building the IJN Yamato

    in nannu pec
    in nannu pec
    Best in Show
    Best in Show


    Posts : 2019
    Join date : 2009-07-23
    Age : 75
    Location : Qawra Malta

    Step by Step building the IJN Yamato Empty Step by Step building the IJN Yamato

    Post  in nannu pec Thu Aug 13, 2009 10:53 am

    I have now built 3 carriers in a row , so I decided that's it's now time for a change and I opted to go for a battleship and what else but the mighty Yamato.
    It's been lying on the shelf for a while and I have always kept the project on hold because of the challenging changes I had in mind and now ,I think I am read for this build.
    As soon as I opened the box I decided there and then , that the wooden part of the deck has to be made of real wood. You can buy these ready made, but they are so damm expensive and I have already spent a fortune on photoetch and other miscellaneous fittings, but above all I wanted to make the wooden part of the deck scratchbuilt. It's more of a challenge.
    Step by Step building the IJN Yamato Sv208715
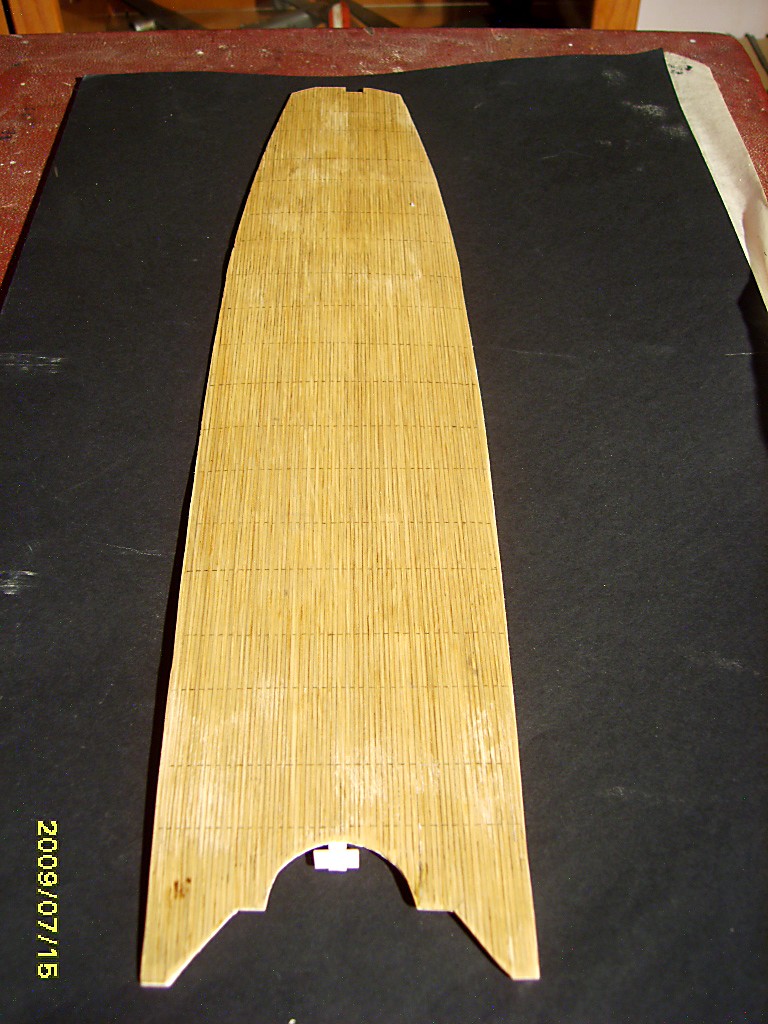
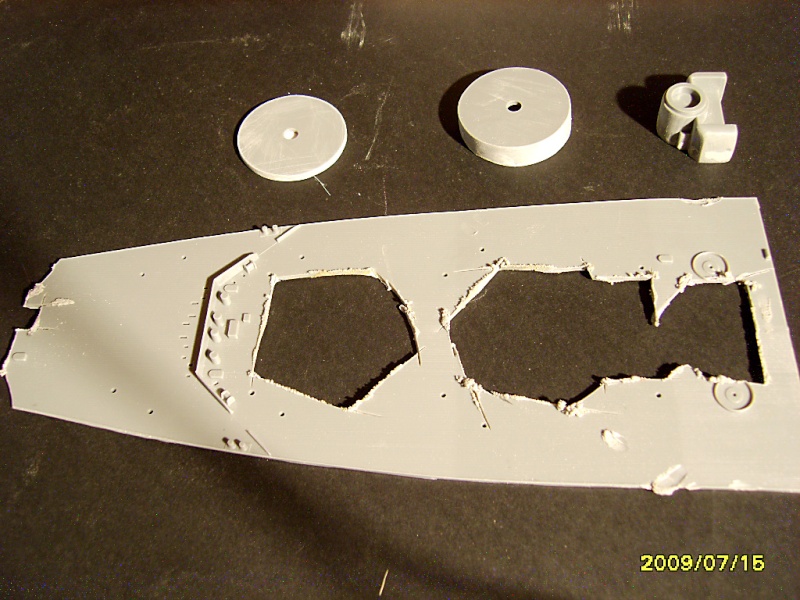
    It took quite a while to measure and shape an exact fit of this new deck with the other two parts which obviously had to be sawn off from the provided parts of the kit, which were now totally destroyed anmd then discarded. The whole wooden deck was made out of plastic card and strengthened with thick plastic evergreen strips from underneath. When I had a perfect fit, after about six attempts, I covered the prepared plastic card deck with a very thin wood laminate to simulate the real thing. When dry the whole deck was trimmed and sanded vigourously then lined with a very thin tip pencil to simulate the planing on the deck. A jig was made with a simple steel rule to keep the spacing even and accurate. The planking is very fine and can barely be seen in the picture provided. I t was a tedious job and demanded a lot of patience. The deck was given ample coats of a satin finish varnish as it is in its present state which is not so attractive. A few white stains have also to be corrected . With all corrections affected it will be sanded down and given a coat of matt varnish, which will make it look totally different to its present state.
    Step by Step building the IJN Yamato Sv208716
    Step by Step building the IJN Yamato Sv208717
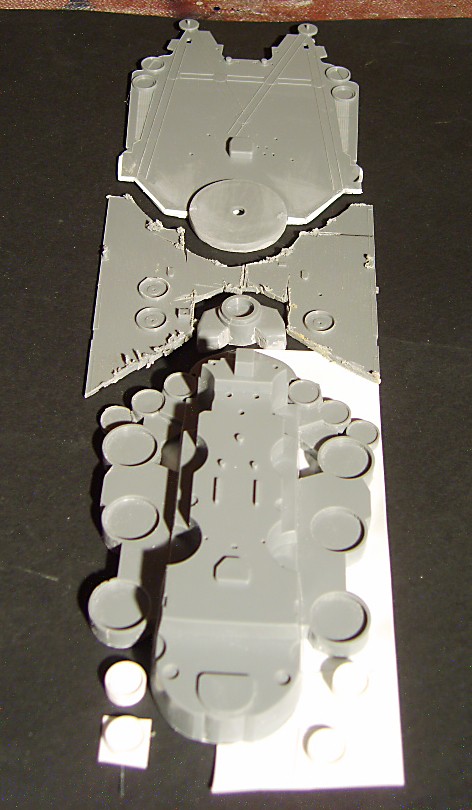
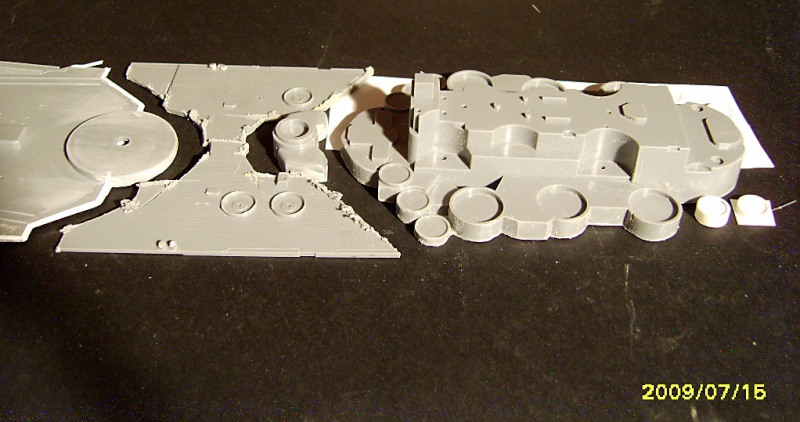
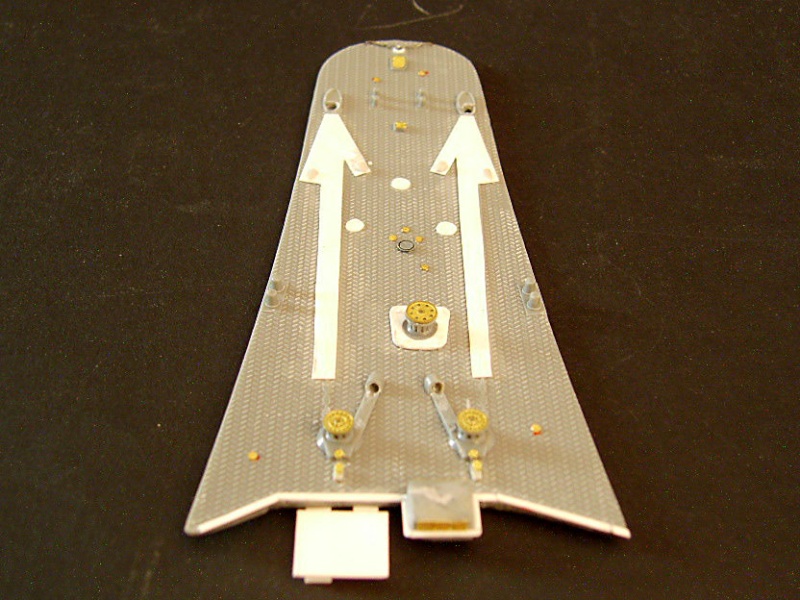
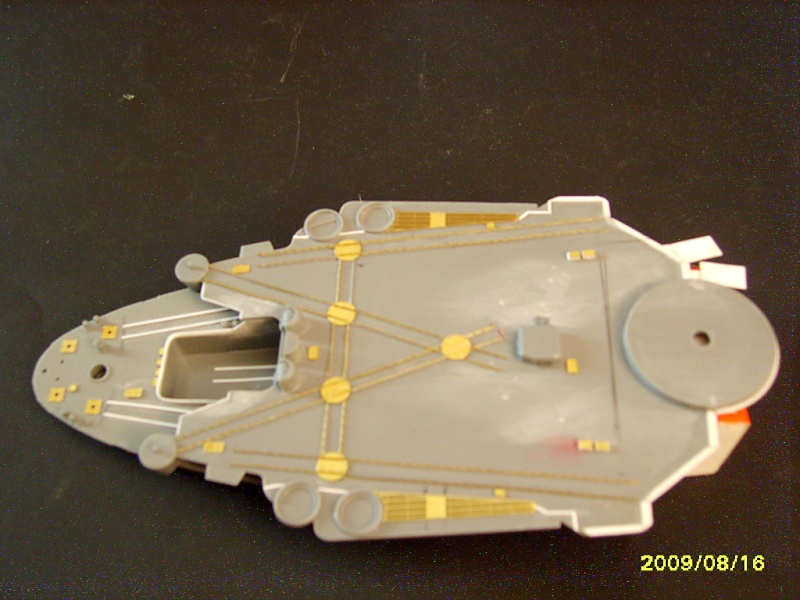
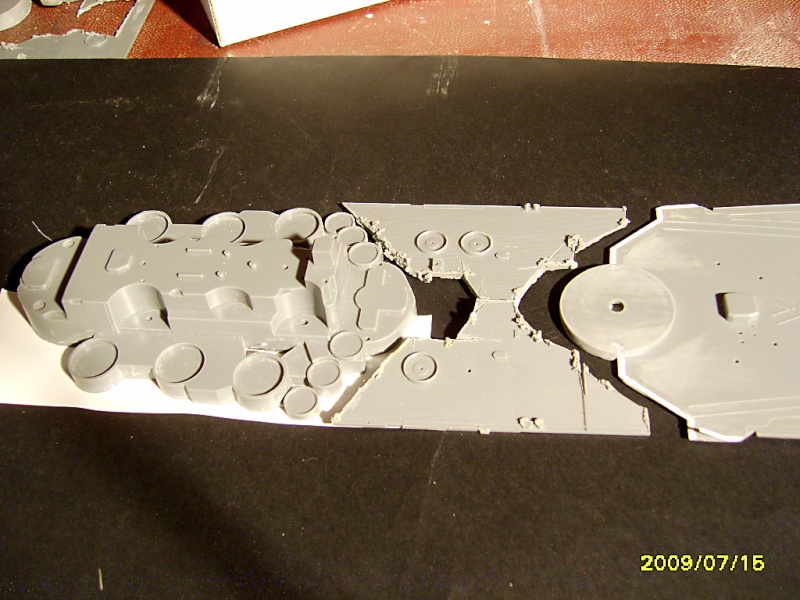
    Now for the tricky bit , I had to cut and prise out the parts of the superstructure from the moulded part of the supposed to be wooden deck provided by the kit. This wasn't easy and have various cuts in my fingers to prove it. Various tools were used. Care had also to be taken to take away the thickness of the plastic to end up with correct levels all round. Some damage was done in the process and loads of filler had to be used to correct the said damage. Several gun column platforms were destroyed in the processed and new ones had to be scratchbuilt. Of course all the small fittings , raised detail and gun positions on the discarded decks have to be scratchbuilt and many resin copies have to be made with the help of Alex of course
    Step by Step building the IJN Yamato Sv208718
    Step by Step building the IJN Yamato Sv208719
    Next step is to work on the bow and stern of the ship and later I will start works on the hull, which will definetely keep me very occupied.
    I hope I didn't bore you to bits but I think , step by step build articles will further enhance the already most popular club forum.
    Louis
    Dottore
    Dottore
    Gold
    Gold


    Posts : 1388
    Join date : 2009-07-21
    Age : 46
    Location : Tarxien, Malta

    Step by Step building the IJN Yamato Empty modelling at its best....

    Post  Dottore Thu Aug 13, 2009 11:06 am

    impressive work PEC!...

    great to see in progress builds of your masterpieces!

    Keep them coming!

    Dottore
    Alex Kontiveis
    Alex Kontiveis
    Silver
    Silver


    Posts : 356
    Join date : 2009-08-04
    Age : 53
    Location : Greece

    Step by Step building the IJN Yamato Empty Re: Step by Step building the IJN Yamato

    Post  Alex Kontiveis Thu Aug 13, 2009 11:33 am

    Pictures say nothing!!!! You have to see it ALIVE!!! Incredible!! I was amazed with his "laser cut" fitting of the pieces!! He achieved Tamiya quality...although he has blown up the whole deck to rebuild it!!!
    ....All these in a workshop 1X1m....(I think its a bit smaller!)

    What happens if you miss a "PE" piece on the floor??? lol! lol! lol! lol!
    Noel Petroni
    Noel Petroni
    Gold
    Gold


    Posts : 1232
    Join date : 2009-07-21
    Age : 62
    Location : Balzan - Malta

    Step by Step building the IJN Yamato Empty Re: Step by Step building the IJN Yamato

    Post  Noel Petroni Thu Aug 13, 2009 12:28 pm

    Impressive, very impressive!

    Regards
    Noel
    alexbb
    alexbb
    Best in Show
    Best in Show


    Posts : 1710
    Join date : 2009-07-21
    Age : 62

    Step by Step building the IJN Yamato Empty Re: Step by Step building the IJN Yamato

    Post  alexbb Thu Aug 13, 2009 12:52 pm

    genju mignun (mad genious)
    Ray
    Ray
    Best in Show
    Best in Show


    Posts : 6102
    Join date : 2009-07-21
    Age : 60
    Location : Zurrieq MALTA

    Step by Step building the IJN Yamato Empty Re: Step by Step building the IJN Yamato

    Post  Ray Thu Aug 13, 2009 2:30 pm

    I can only echo what the others have said before me Twisted Evil Evil or Very Mad

    Keep up the great work Ja Pecluq I love you

    Ray affraid
    avatar
    Guest
    Guest


    Step by Step building the IJN Yamato Empty Re: Step by Step building the IJN Yamato

    Post  Guest Thu Aug 13, 2009 5:19 pm

    Looks it is going to be great job
    in nannu pec
    in nannu pec
    Best in Show
    Best in Show


    Posts : 2019
    Join date : 2009-07-23
    Age : 75
    Location : Qawra Malta

    Step by Step building the IJN Yamato Empty IJN Yamato

    Post  in nannu pec Thu Aug 13, 2009 5:36 pm

    Hi u guys thank u all for your kind comments Very Happy Very Happy
    Actually I ve just calmed my self down after a serious session of swearing my head off cherry cherry ....thought that was a bomb or something......louis ...thick...thick...thick...was looking thru some pics for reference and found out I fixed about 3 or 4 ventilator grids in the wrong place....swear...swear ...swear...my wife conveniently dissappeared and went to her mum's flat....anyway after calming down Sad Sad Sad i managed to take them off without much damage..so have to go over the area again...so many friggin ventilators...
    Alex u will soon get your updates for this monster as these pics were taken a while ago...it's a very challenging project and I am crazy...oh Alex another Maltese word for u....MIGNUN....which means crazy like me lol! lol! lol! lol! give me the equivalent in Greek my feelos...guys that's friend in Greek !!!
    Again kind sirs thank u for your encouraging comments....comments like these make even eager to finish the job I have undertaken...
    Oh i found the bomb
    bom bom bom bom bom .....idiot Louis
    Take care u guys
    Il Pec
    PS Alex that's my nickname at the club... cheers cheers cheers
    Ray
    Ray
    Best in Show
    Best in Show


    Posts : 6102
    Join date : 2009-07-21
    Age : 60
    Location : Zurrieq MALTA

    Step by Step building the IJN Yamato Empty Re: Step by Step building the IJN Yamato

    Post  Ray Thu Aug 13, 2009 8:05 pm

    Things that RUN Ja Pecluq Twisted Evil

    Ray affraid
    in nannu pec
    in nannu pec
    Best in Show
    Best in Show


    Posts : 2019
    Join date : 2009-07-23
    Age : 75
    Location : Qawra Malta

    Step by Step building the IJN Yamato Empty IJN Yamato Step 2

    Post  in nannu pec Mon Aug 17, 2009 9:42 am

    I have now finished works on the hull which was very straightforward. After sawing off the lower part which was quite tedious I strengthened the whole structure with thick plastic strips so that when I come top the point of attaching the deck I should have a good fit and have no problems. Not a lot of extra work needed on the sides of the hull as the ship was quite plain with no complicated piping and trunking
    Step by Step building the IJN Yamato Sv208912
    I then started on the 15.5 barbettes, which I detailed acordingly. Again it was no big deal.More detail will be added when they are painted and weathered
    Step by Step building the IJN Yamato Sv208920
    The bow steel part of the deck was detailed. The embossed chains were taken off and platform bases for the same anchor chains were scratchbuilt as thos on the kit were not that accurate. Minor additions were also included, which were on the ship duringg The Ichigo operation.
    Step by Step building the IJN Yamato Sv208914
    The stern concrete part of the ship which will house the hangar and aircraft catapults was now tackled. white ensign phot etch was used and further detail added especially in the hangar area . Of course all the fine detail will be added later to avoid damage whilst painting and weathering the specified area.
    Step by Step building the IJN Yamato Sv208915
    Step by Step building the IJN Yamato Sv208916
    Next I started having a go at the superstucture which comes in four parts . The forward and aft tower, the funnel arrangement and the the base to take these 3 components. I tend to do some work here and there in these sections, just for the sake of not getting bored. I t makes it more interesting as well as I tend to discover more detail that I have overlooked while researching the model.
    Step by Step building the IJN Yamato Sv208917
    Step by Step building the IJN Yamato Sv208918
    Step by Step building the IJN Yamato Sv208919
    I am really enjoying this build , as said previously it's a nice change to a carrier. More work will have to be done on the superstructure . I will keep you posted on its progress and hope I don't bore you to death in the process SmileSmileSmile
    il pec
    Joseph
    Joseph
    Silver
    Silver


    Posts : 621
    Join date : 2009-07-23
    Age : 55
    Location : Zurrieq - Malta

    Step by Step building the IJN Yamato Empty Re: Step by Step building the IJN Yamato

    Post  Joseph Mon Aug 17, 2009 10:08 am

    Int pecluq ta' vera, very nice detail!!! well done Laughing Laughing Laughing

    Next time show us the louvers that you had to take off and re-do Smile . Ghadhom tajbin ghajnejk ghax is-superstructure dritta ghamilta, nahseb li anke dawk il-linji ta' wara jidru driti lol! lol! Well done.

    J
    in nannu pec
    in nannu pec
    Best in Show
    Best in Show


    Posts : 2019
    Join date : 2009-07-23
    Age : 75
    Location : Qawra Malta

    Step by Step building the IJN Yamato Empty Tanks

    Post  in nannu pec Mon Aug 17, 2009 1:42 pm

    Tank u Guz.......iva domt inkejjel biex jigu dritti lol! lol! lol! lol!
    enjoying the build....
    IL PEC cheers cheers
    skyhigh
    skyhigh
    Best in Show
    Best in Show


    Posts : 4654
    Join date : 2009-07-30
    Age : 62
    Location : Qormi, Malta

    Step by Step building the IJN Yamato Empty Re: Step by Step building the IJN Yamato

    Post  skyhigh Mon Aug 17, 2009 1:43 pm

    Your the one and only Pec ..take care.. cheers
    Ray
    Ray
    Best in Show
    Best in Show


    Posts : 6102
    Join date : 2009-07-21
    Age : 60
    Location : Zurrieq MALTA

    Step by Step building the IJN Yamato Empty Re: Step by Step building the IJN Yamato

    Post  Ray Mon Aug 17, 2009 2:20 pm

    Some Masterfull work I see here Ja Pecluq and I also see that it passed some scrutineering eyes before me Suspect

    Ray affraid
    avatar
    Guest
    Guest


    Step by Step building the IJN Yamato Empty Re: Step by Step building the IJN Yamato

    Post  Guest Mon Aug 17, 2009 7:18 pm

    PEC 1 wrote:Hi u guys thank u all for your kind comments Very Happy Very Happy
    Actually I ve just calmed my self down after a serious session of swearing my head off cherry cherry ....thought that was a bomb or something......louis ...thick...thick...thick...was looking thru some pics for reference and found out I fixed about 3 or 4 ventilator grids in the wrong place....swear...swear ...swear...my wife conveniently dissappeared and went to her mum's flat....anyway after calming down Sad Sad Sad i managed to take them off without much damage..so have to go over the area again...so many friggin ventilators...
    Alex u will soon get your updates for this monster as these pics were taken a while ago...it's a very challenging project and I am crazy...oh Alex another Maltese word for u....MIGNUN....which means crazy like me lol! lol! lol! lol! give me the equivalent in Greek my feelos...guys that's friend in Greek !!!
    Again kind sirs thank u for your encouraging comments....comments like these make even eager to finish the job I have undertaken...
    Oh i found the bomb
    bom bom bom bom bom .....idiot Louis
    Take care u guys
    Il Pec
    PS Alex that's my nickname at the club... cheers cheers cheers


    At least it wasn't a wing Very Happy Very Happy

    Don't worry I did the same thing with the hawkeye, and fixed the outer tail upside down and started to spray, nearly cut off my finger to rectify, slip of the blade Sad Sad I think a stitch or two could have done it but managed DIY.


    Excellent work and I really admire your work. Keep posting.


    Last edited by FJ on Mon Aug 17, 2009 8:54 pm; edited 1 time in total
    Dottore
    Dottore
    Gold
    Gold


    Posts : 1388
    Join date : 2009-07-21
    Age : 46
    Location : Tarxien, Malta

    Step by Step building the IJN Yamato Empty Awesome....

    Post  Dottore Mon Aug 17, 2009 7:32 pm

    Hope to be going strong as u r at the venerable tender age you are in !!!
    Love this build Pec!

    Dottore cat
    David
    David
    Silver
    Silver


    Posts : 421
    Join date : 2009-07-22
    Age : 61

    Step by Step building the IJN Yamato Empty Re: Step by Step building the IJN Yamato

    Post  David Mon Aug 17, 2009 9:22 pm

    You keep excelling your previous work

    Prosit
    Tancred
    Tancred
    Admin


    Posts : 1079
    Join date : 2009-07-20
    Age : 52
    Location : Attard, Malta

    Step by Step building the IJN Yamato Empty Re: Step by Step building the IJN Yamato

    Post  Tancred Mon Aug 17, 2009 9:46 pm

    Another masterpiece from you Louis. Interesting to see it built step by step on the forum bounce something difficult to do at the club for this size of model.

    Reminded me of an anime series called Starblazers where they resurrected the Yamato and turned it into a spaceship Cool
    used to watch it every day after school.

    Sahha

    Tancred afro
    avatar
    Guest
    Guest


    Step by Step building the IJN Yamato Empty Re: Step by Step building the IJN Yamato

    Post  Guest Mon Aug 17, 2009 10:00 pm

    Tancred wrote:Another masterpiece from you Louis. Interesting to see it built step by step on the forum bounce something difficult to do at the club for this size of model.

    Reminded me of an anime series called Starblazers where they resurrected the Yamato and turned it into a spaceship Cool
    used to watch it every day after school.

    Sahha

    Tancred afro

    actually there is a 1/350th scale model of the space battleship Yamato from the series, with lots of extras but with a high price tag - about 300 euros.
    in nannu pec
    in nannu pec
    Best in Show
    Best in Show


    Posts : 2019
    Join date : 2009-07-23
    Age : 75
    Location : Qawra Malta

    Step by Step building the IJN Yamato Empty IJN YAMATO

    Post  in nannu pec Tue Sep 15, 2009 3:51 pm

    well the project is proceeding well. After the previous illustrations and once the individual parts of the superstructure have been prized out from the deck, I proceeded to start works on the funnel and its support structure. The main piping and trunking was left as it was quite acceptable , the rest was scratchbuilt using different gauges of fuse wire, stretched sprue and evergreen plastic strips.The funnel top part was hollowed and photetch used. Step by Step building the IJN Yamato Sv209613 Step by Step building the IJN Yamato Sv209614
    Further detail was added to the main tower which include extra port holes....door openings at the back of the tower which will then incorporate various ladders leading to the top. The top part was scrtachbuilt as had to include wooden decking as seen on pi. Of course further detail mainly antenas have to to be icluded further onStep by Step building the IJN Yamato Sv209615Step by Step building the IJN Yamato Sv209616
    I decided tyo have a go at the business end of the yamato which include the 15.7 and 18.1 calibre guns, All plastic barrels removed and replaced by more accurate brass components. The main turret was detailed and various ammunition boxes added as armed in the Ten Ichigo operation. Scratchbuilt blast bags on the 15.7 guns were built out of putty as none in the kit. These guns will be further minutely detailed after painting to avoid damage to the flimsy photoetch Step by Step building the IJN Yamato Sv209617Step by Step building the IJN Yamato Sv209618Step by Step building the IJN Yamato Sv209619Step by Step building the IJN Yamato Sv209620Step by Step building the IJN Yamato Sv209621
    Next I started to tackle the twin barrel 12.7 mountings. A wood laminate base, similar to the deck planking had to be fashioned out and later a round plastic mount was included the pics show the different parts that had to be built to complete the whole component. The AA Gun is a resin offering from Veteran models with brass barrels included. This was also further detailed and as usual more detail to be added to avod damage. Step by Step building the IJN Yamato Sv209622 Step by Step building the IJN Yamato Sv209623Step by Step building the IJN Yamato Sv209624
    Will now continue works on the main and AA guns and believe you me there are so many of them.
    alexbb
    alexbb
    Best in Show
    Best in Show


    Posts : 1710
    Join date : 2009-07-21
    Age : 62

    Step by Step building the IJN Yamato Empty Re: Step by Step building the IJN Yamato

    Post  alexbb Tue Sep 15, 2009 4:07 pm

    wig
    ara din
    http://tanksandthings.niceboard.org/hot-gossip-f7/ssm-ipms-malta-forum-t2770.htm
    Proximo41
    Proximo41
    Bronze
    Bronze


    Posts : 287
    Join date : 2009-09-03
    Age : 55

    Step by Step building the IJN Yamato Empty Re: Step by Step building the IJN Yamato

    Post  Proximo41 Tue Sep 15, 2009 4:27 pm

    maaaaaaaa tal biza wigi... qisek heq tibni lil Frankenstein!!! proset wigi keep it up
    in nannu pec
    in nannu pec
    Best in Show
    Best in Show


    Posts : 2019
    Join date : 2009-07-23
    Age : 75
    Location : Qawra Malta

    Step by Step building the IJN Yamato Empty Tajba Alex

    Post  in nannu pec Tue Sep 15, 2009 5:21 pm

    Bicca xoghol vera imma nahseb the end result will be worth it...thanks siehbi..... Ehmmmmmmmm bannanus....proximo ( DAQSU GHANDEK XAR ) lol lol lol...xizjed...SmileSmileSmile: tanks tal comments man
    Il pec. cheers
    avatar
    Guest
    Guest


    Step by Step building the IJN Yamato Empty Re: Step by Step building the IJN Yamato

    Post  Guest Wed Sep 16, 2009 6:12 pm

    amazing ship and great, great work.
    bcauchi
    bcauchi
    Best in Show
    Best in Show


    Posts : 4088
    Join date : 2009-07-30
    Age : 62
    Location : St. Julian's

    Step by Step building the IJN Yamato Empty Re: Step by Step building the IJN Yamato

    Post  bcauchi Thu Sep 17, 2009 7:32 am

    Lou i don't know how i missed your latest work. This is really magnificent work you are doing. Every little detail you are putting in is amazing, when you realise how small the things are, wow, they leave me stupefied. Keep this up my friend, it is really wonderful.

    Sponsored content


    Step by Step building the IJN Yamato Empty Re: Step by Step building the IJN Yamato

    Post  Sponsored content


      Current date/time is Tue Mar 19, 2024 12:14 pm