

Very nice work ..welldone.. 
+10
bcauchi
Dottore
Paul Salomone
in nannu pec
ferraribert
Ray
el manolo
Robert
skyhigh
5Nige
14 posters
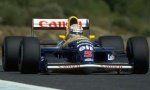
Leyton House CG901B

skyhigh- Best in Show

- Posts : 4654
Join date : 2009-07-30
Age : 63
Location : Qormi, Malta
5Nige- Commended

- Posts : 95
Join date : 2012-12-23
Age : 53
Location : B'Kara
More progress: paint was laid, with materials used being: Pure brilliant white and Leyton House Aquamarine Blue both by Zero Paints, and green by Mr Hobby (decanted and shot through the airbrush). Please note that the colors are base coat colors and need clear coating.
[img] [/img]
Monocoque still requires carbon fibering.
[img] [/img]
img] [/img]
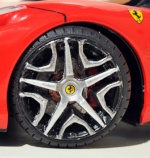
Tyres: yess, this time the logo is sprayed not decalled. When the car will be completed then the side(L, R) and revolving indicators will be added. The tyres were sanded beforehand, removing the sheen and mould mark from the contact surface.
[img] [/img]
[img] [/img]
Exhausts: here the process was a bit long, but have to say one of my favourites. The fabulous Alclad hot metal series was used here. This time the exhausts have a slight golden sheen on them, yet if one were to shoot the hot metal blue over yellow
green wold result. Thus after applying polished aluminium over semi gloss black, MOTIP paint decanted and shot through the airbrush, a light transparent yellow was applied, followed again by another light sealing polished aluminium. This way the yellow and blue are separated and no interaction should occur.
Transparent yellow over polished alu.
[img] [/img]
Following the second polished coating hot metal violet stain was applied.
[img] [/img]
Hot metal blue, light coat as this is a very strong color, is applied. Here although a greenish hue appears this is due to light reflection and not paint interaction.
[img] [/img]
This was then followed by a mist coat of hot metal red, then an overall dust coat of transparent smoke.
[img] [/img]
A very happy with the result, as the polished alu base is still highly visible yet all colors therafter applied still bounce through, especially with light reflections. All that now remains is a light wash, especially where the pipes are wed into one, yet am undecided as to whether to use black or sepia - both Vallejo washes. Any opinions are more than welcome.
The other parts have all been colored, mostly semi gloss black.
Next stage: carbon fibering and overall clear coating, to be followed by decals and the sealing clear coat.
[img]
[/img]Monocoque still requires carbon fibering.
[img]
[/img]img]
[/img]Tyres: yess, this time the logo is sprayed not decalled. When the car will be completed then the side(L, R) and revolving indicators will be added. The tyres were sanded beforehand, removing the sheen and mould mark from the contact surface.
[img]
[/img][img]
[/img]Exhausts: here the process was a bit long, but have to say one of my favourites. The fabulous Alclad hot metal series was used here. This time the exhausts have a slight golden sheen on them, yet if one were to shoot the hot metal blue over yellow
green wold result. Thus after applying polished aluminium over semi gloss black, MOTIP paint decanted and shot through the airbrush, a light transparent yellow was applied, followed again by another light sealing polished aluminium. This way the yellow and blue are separated and no interaction should occur.
Transparent yellow over polished alu.
[img]
[/img]Following the second polished coating hot metal violet stain was applied.
[img]
[/img]Hot metal blue, light coat as this is a very strong color, is applied. Here although a greenish hue appears this is due to light reflection and not paint interaction.
[img]
[/img]This was then followed by a mist coat of hot metal red, then an overall dust coat of transparent smoke.
[img]
[/img]A very happy with the result, as the polished alu base is still highly visible yet all colors therafter applied still bounce through, especially with light reflections. All that now remains is a light wash, especially where the pipes are wed into one, yet am undecided as to whether to use black or sepia - both Vallejo washes. Any opinions are more than welcome.
The other parts have all been colored, mostly semi gloss black.
Next stage: carbon fibering and overall clear coating, to be followed by decals and the sealing clear coat.
skyhigh- Best in Show
- Posts : 4654
Join date : 2009-07-30
Age : 63
Location : Qormi, Malta
Prosit eh... very good process....
Ray- Best in Show
- Posts : 6102
Join date : 2009-07-21
Age : 61
Location : Zurrieq MALTA
Meticulous progress Alan 

Robert- Bronze

- Posts : 259
Join date : 2012-06-14
Age : 41
Location : Haz-zebbug
nice Alan keep it up
el manolo- Bronze
- Posts : 287
Join date : 2012-03-15
Age : 38
tal genn dak l exhaust pipes

Guest- Guest
skyhigh wrote:Prosit eh... very good process....
make X 2!![b]
5Nige- Commended
- Posts : 95
Join date : 2012-12-23
Age : 53
Location : B'Kara
Finally, after a short break due to work, a rough patch in life and now heat  , I hope to be able to build a rhythm to say work to a finish. to date I have carbon fibered all the required areas, decalled and clear coated. Now I am polishing following which the model will be put together. The pics are just a teaser of part of the work completed, with more progress earmarked for the week-end.
The monocoque chassis polished - still a little bit to do but:

 " />
" />
 " />
" />
 " />
" />
 " />
" />
Hope to keep the updates coming now:D
The monocoque chassis polished - still a little bit to do but:
" />" />" />" />Hope to keep the updates coming now:D
el manolo- Bronze
- Posts : 287
Join date : 2012-03-15
Age : 38
good progress so far!

bcauchi- Best in Show
- Posts : 4088
Join date : 2009-07-30
Age : 63
Location : St. Julian's
Lovely work Alan, your patience sure pays off. The exhaust is great and so are the tyres, nothing like a good paintjob, once you try that out you will not go back to decals. Dying to see this finished, looking really nice.
in nannu pec- Best in Show
- Posts : 2019
Join date : 2009-07-23
Age : 75
Location : Qawra Malta
nice and pristine work Alan...
in nannu
in nannu
Ray- Best in Show
- Posts : 6102
Join date : 2009-07-21
Age : 61
Location : Zurrieq MALTA
Fantastic work Alan 
Guest- Guest
Ray wrote:Fantastic work Alan
make it X2
5Nige- Commended
- Posts : 95
Join date : 2012-12-23
Age : 53
Location : B'Kara
FINALLY some progress on this kit. Cockpit area was the target, where the following were added:
Seat belts
seat and steering flocking
scratch building of the brake balance adjuster
steering wheel wire connections to the instrument panel
carbon fiber decaling of the sides. cockpit bulk head and instrument panel. This process was tedious and a real pain as no carbon fibre templates exist for this kit.
 " />
" />
 " />
" />
 " />
" />
 " />
" />
 " />
" />
The pin protruding from the steering wheel is a guide to the steering rod, which is next in line together with the front end. Hope for more frequent updates now.
Seat belts
seat and steering flocking
scratch building of the brake balance adjuster
steering wheel wire connections to the instrument panel
carbon fiber decaling of the sides. cockpit bulk head and instrument panel. This process was tedious and a real pain as no carbon fibre templates exist for this kit.
" />" />" />" />" />The pin protruding from the steering wheel is a guide to the steering rod, which is next in line together with the front end. Hope for more frequent updates now.
Robert- Bronze
- Posts : 259
Join date : 2012-06-14
Age : 41
Location : Haz-zebbug
Prosit Alan
Ray- Best in Show
- Posts : 6102
Join date : 2009-07-21
Age : 61
Location : Zurrieq MALTA
Great work as always Alan

ferraribert- Highly Commended

- Posts : 127
Join date : 2012-03-20
Age : 46
Location : gharghur
very nice Alan keep it up
el manolo- Bronze
- Posts : 287
Join date : 2012-03-15
Age : 38
x hin tlesti addieli c cavetta 
5Nige- Commended
- Posts : 95
Join date : 2012-12-23
Age : 53
Location : B'Kara
And so the build up continues. The front end is almost complete, the remaining 2 items being the small wind shield and the attachment of the top inspection panel. These will be done once the build is wrapped up as I still need to give the final wax buff.
Front works is all scratch built and includes inner coil overs, pedals and steering column, and outside including the hydraulic system reservoirs and master cylinders plus connections. Kindly note that for all carbon fiber decals I had to cut the template and then cut from decal sheets, as there is no aftermarket template set for this kit.
 " />
" />
 " />
" />
 " />
" />
 " />
" />
 " />
" />
Brake ducts were also modified to include double sided air intake walls, rather than retaining the 1 side wall as provided with the kit. These parts were a pain to cover in cf.
 " />
" />
Test fit with the engine n exhausts
 " />
" />
Exhaust outlets were also drilled and the exhaust ends also modified accordingly. The undertray is also covered in carbon fiber decals.
 " />
" />
Work completed to date, including the nose cone. The end plates were affixed to the wing plane with 1mm scale allen head rivets.
 " />
" />
Up next are the electronic boxes and the accompanying wire looms, all of which sits on the side pods.
 " />
" />
Front works is all scratch built and includes inner coil overs, pedals and steering column, and outside including the hydraulic system reservoirs and master cylinders plus connections. Kindly note that for all carbon fiber decals I had to cut the template and then cut from decal sheets, as there is no aftermarket template set for this kit.
" />" />" />" />" />Brake ducts were also modified to include double sided air intake walls, rather than retaining the 1 side wall as provided with the kit. These parts were a pain to cover in cf.
" />Test fit with the engine n exhausts
" />Exhaust outlets were also drilled and the exhaust ends also modified accordingly. The undertray is also covered in carbon fiber decals.
" />Work completed to date, including the nose cone. The end plates were affixed to the wing plane with 1mm scale allen head rivets.
" />Up next are the electronic boxes and the accompanying wire looms, all of which sits on the side pods.
" />
Ray- Best in Show
- Posts : 6102
Join date : 2009-07-21
Age : 61
Location : Zurrieq MALTA
That is some detail & painstaking carbon fibre Alan Weldone eh
skyhigh- Best in Show
- Posts : 4654
Join date : 2009-07-30
Age : 63
Location : Qormi, Malta
Very good work Alan......
bcauchi- Best in Show
- Posts : 4088
Join date : 2009-07-30
Age : 63
Location : St. Julian's
fantastic work!
ferraribert- Highly Commended
- Posts : 127
Join date : 2012-03-20
Age : 46
Location : gharghur
Bomba.....must pay you a visit
Noel Petroni- Gold

- Posts : 1232
Join date : 2009-07-21
Age : 62
Location : Balzan - Malta
Mela anke tal karrozzi imginen!!
That is some super detailing!!! Well done!
That is some super detailing!!! Well done!
el manolo- Bronze
- Posts : 287
Join date : 2012-03-15
Age : 38

|
|
|