+9
skyhigh
alexbb
William
bcauchi
Gordon
Tancred
matilda
Joseph
Ray
13 posters
Italeri 1/48th MB326 A Italian Airforce

Ray- Best in Show

- Posts : 6102
Join date : 2009-07-21
Age : 61
Location : Zurrieq MALTA
It could be sanded down Antoine so there's nothing to fret about 

bcauchi- Best in Show

- Posts : 4088
Join date : 2009-07-30
Age : 63
Location : St. Julian's
You ALWAYS need to sand down the glosscoat. Actually, for good results you need to sand it down and reapply another coat. Otherwise, looking really nice. Well done.

Guest- Guest
HI guys!
The problem is that I've sanded and reapplied the gloss coat for several times!
Am I reapplying too much gloss coats??
How you will know that the model has recieved anough gloss coats?
N.B I'm spraying the aircraft with gloss to prepare it for decalling.
The problem is that I've sanded and reapplied the gloss coat for several times!
Am I reapplying too much gloss coats??
How you will know that the model has recieved anough gloss coats?
N.B I'm spraying the aircraft with gloss to prepare it for decalling.

Ray- Best in Show

- Posts : 6102
Join date : 2009-07-21
Age : 61
Location : Zurrieq MALTA
RAF wrote:HI guys!
The problem is that I've sanded and reapplied the gloss coat for several times!
Am I reapplying too much gloss coats??
How you will know that the model has recieved anough gloss coats?
N.B I'm spraying the aircraft with gloss to prepare it for decalling.
If the dilution rate of the clear gloss/thinner is appropriate, and you apply even strokes (seems like your story of applying the cream on the organ
Before you apply the decals, you're still going to sand the surface down again, so that should take care of any blotches up till then I presume
It seems like I'm spraying again hux


Guest- Guest
Ray wrote:RAF wrote:HI guys!
The problem is that I've sanded and reapplied the gloss coat for several times!
Am I reapplying too much gloss coats??
How you will know that the model has recieved anough gloss coats?
N.B I'm spraying the aircraft with gloss to prepare it for decalling.
If the dilution rate of the clear gloss/thinner is appropriate, and you apply even strokes (seems like your story of applying the cream on the organ) of spray, you should get an even finish. Do not accumulate applications instantly, that is before the previous rash has dried out.
Before you apply the decals, you're still going to sand the surface down again, so that should take care of any blotches up till then I presume
It seems like I'm spraying again hux


Guest- Guest
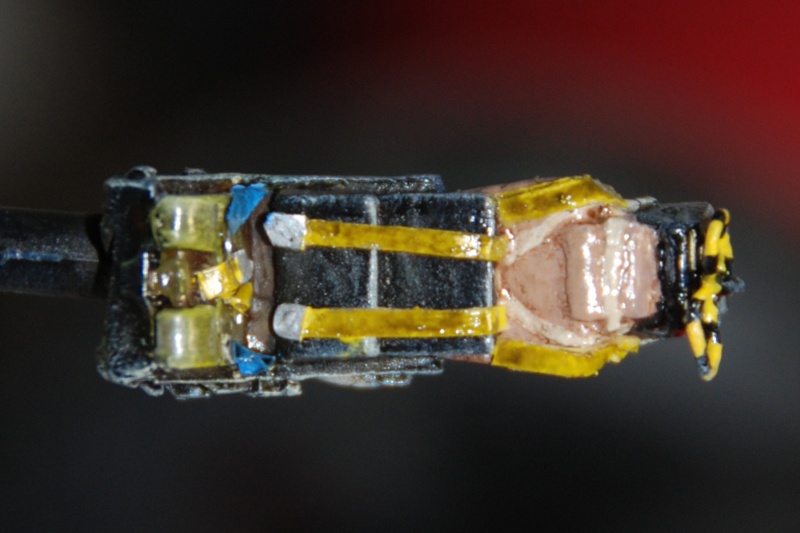
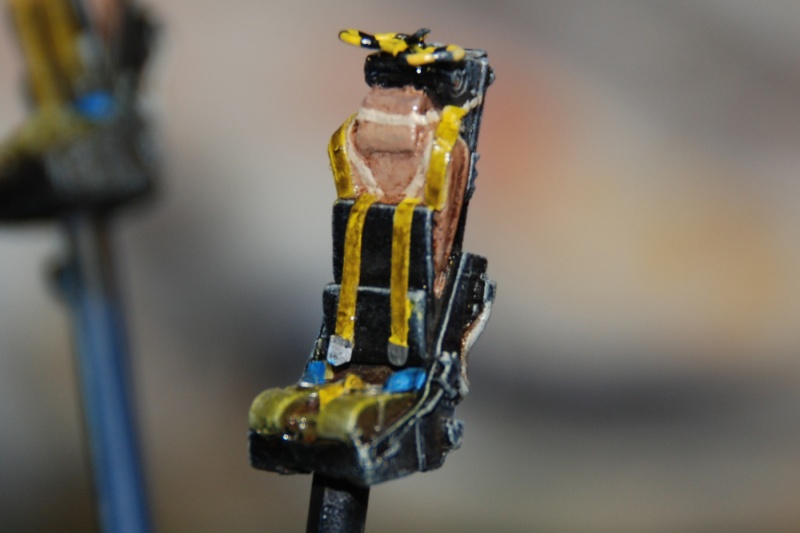
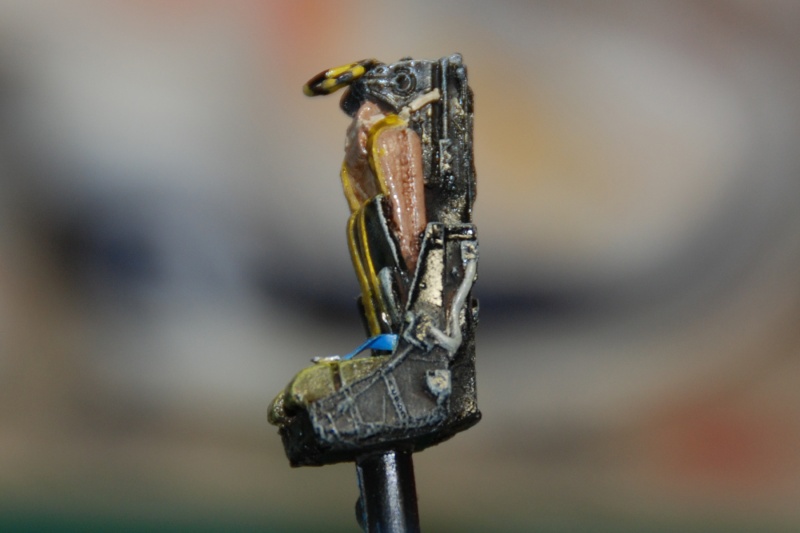
Some more Progress. The seats are nearly ready. The Safety Belts and the Ejection Pulls are scratchbuilt. The seats still need a dull cote or a semi gloss.


Ray- Best in Show

- Posts : 6102
Join date : 2009-07-21
Age : 61
Location : Zurrieq MALTA
I'm sure the quality and enlargement of the pics are not doing any justice. Also the glossy surface is adding an unwanted glare sort of. Thus I cannot and will not comment on the quality of your work from these digital images 
Best thing to do is bring your work over at Club this eve and you'll get an honest and clear opinion from everyone
Good day to ALL
Best thing to do is bring your work over at Club this eve and you'll get an honest and clear opinion from everyone
Good day to ALL


bcauchi- Best in Show

- Posts : 4088
Join date : 2009-07-30
Age : 63
Location : St. Julian's
I don't know anything about modern aircraft and the colours to use. However, the seat itself looks good and so does the green cushion, i am not sure about the brownish hue on the head cushion.

Gordon- Gold

- Posts : 707
Join date : 2009-07-23
Age : 44
Location : bormla
RAF,is-seats matti ikunu mhux semi gloss


Guest- Guest
Thanks Guys!
As Ray pointed out the enlargment is not showing the real look of the actual model. The wash is appearing as overdone.
@Brian I will do some more drybrushing to kill the hue a bit.
As Ray pointed out the enlargment is not showing the real look of the actual model. The wash is appearing as overdone.
@Brian I will do some more drybrushing to kill the hue a bit.

bcauchi- Best in Show

- Posts : 4088
Join date : 2009-07-30
Age : 63
Location : St. Julian's
Now that i've seen the photo of the real thing i think that you should do nothing more to it before you apply a matt coat. The colours will change when you apply a matt coat. First do that and then decide if you need to do anything else to it.

iCocker- Best in Show

- Posts : 3172
Join date : 2009-07-21
Age : 50
Location : Marsascala, Malta
Antoine
Instead of overall wash, next time try to apply controlled pin washes. If you notice a wash, which nowadays has gone to a phase that is called a 'filter', is used to control the hue of the overall background colour, ie. you find a complimentary colour to get rid of contrasts on a camo or different colour object etc etc.
Unfortunetly the idea of using a wash to get depth is not that advisable on prominent areas, as it tend to 'dirty' other colours. Pin washing is when with a controlled mix you put the shadow were it rightly has to be ie. directly in creases, receases etc etc; and avoiding to have residue of the wash on the top coloured areas as you have on the belts. To get deeper shadows you just go again in the same areas more then ones. I would prefer to use Sepia instead of Burnt Umber or Raw Umber Oil Paint and add a dap of Naples Yellow to get a death matt finish [always use Artist English Terpentine]. You can also consider the new Vallejo acrylic range and also Games Wokshop has a ready made set of washes that give a matt finish.
It is time consuming but in an area as a seat you really get the impact you are seeking. You just need a good pointed 00 round sable brush.
Try it mate you'll notice the difference ... and keep up the good work!
Ivan
Last edited by iCocker on Wed Aug 11, 2010 3:19 pm; edited 1 time in total

AdriaN- Gold

- Posts : 925
Join date : 2009-08-06
Age : 36
Location : St Julians
iCocker wrote:Adrain
Instead of overall wash, next time try to apply controlled pin washes. If you notice a wash, which nowadays has gone to a phase that is called a 'filter', is used to control the hue of the overall background colour, ie. you find a complimentary colour to get rid of contrasts on a camo or different colour object etc etc.
Unfortunetly the idea of using a wash to get depth is not that advisable on prominent areas, as it tend to 'dirty' other colours. Pin washing is when with a controlled mix you put the shadow were it rightly has to be ie. directly in creases, receases etc etc; and avoiding to have residue of the wash on the top coloured areas as you have on the belts. To get deeper shadows you just go again in the same areas more then ones. I would prefer to use Sepia instead of Burnt Umber or Raw Umber Oil Paint and add a dap of Naples Yellow to get a death matt finish [always use Artist English Terpentine]. You can also consider the new Vallejo acrylic range and also Games Wokshop has a ready made set of washes that give a matt finish.
It is time consuming but in an area as a seat you really get the impact you are seeking. You just need a good pointed 00 round sable brush.
Try it mate you'll notice the difference ... and keep up the good work!
Ivan
ANTOINE not adrian


iCocker- Best in Show

- Posts : 3172
Join date : 2009-07-21
Age : 50
Location : Marsascala, Malta
ANTOINE not adrian
 [/quote]
Updated TKS

Guest- Guest
Normally I use oils for wash bt this time I decided to use the Tamiya smoke acrylic. This was the first time that I've touched any acrylics. I think that I didn't thinned it enough.

iCocker- Best in Show

- Posts : 3172
Join date : 2009-07-21
Age : 50
Location : Marsascala, Malta
Tamiya Smoke is not meant to be used as a wash. How come you used that colour?
Smoke and other transparent paint by Tamiya are more ideal to be used like filters but don with airbrushing, oil stains etc etc apart Tamiya is not real acrylics, they need to be thinned with lacquer to get the best effect. Also it is normal that Smoke dries semigloss.
The ideal material for washes has always been oil paint. Sepia, Burnt Umber, Raw Umber and maybe Lamp Black.
Now there are some new generation ready thinned washes by Vallejo and Games Workshop that are very good to use.
You can get a better idea from master MIG Jimenez ... http://migjimenez.blogspot.com/search/label/washes

AdriaN- Gold

- Posts : 925
Join date : 2009-08-06
Age : 36
Location : St Julians
what exactly is this tamiya smoke ive often heard of??
a clear brown for exhaust stains?
a clear brown for exhaust stains?

iCocker- Best in Show

- Posts : 3172
Join date : 2009-07-21
Age : 50
Location : Marsascala, Malta
Basically Smoke is a mix of diluted translucent Black, probably there is clear varnish as well.
Basically it is more intended to add colour to mettalic parts but has also a good potential for weathering effects, especially oil stains, burnt metal parts etc etc.
For exhaust stains the ideal material is Black pigment, it is totally matt and dusty, can be diluted with water or thinner, ideal MIG Pigments and also Vallejo came out with a set as well.
Avoid chalk or oil pastels as they are not pure ...
Ivan

iCocker- Best in Show

- Posts : 3172
Join date : 2009-07-21
Age : 50
Location : Marsascala, Malta
Locally for Vallejo is KHobbies, Fgura and for MIG it is ForbiddenPower, Msida.
Otherwise online, directly from suppliers as well ...
Otherwise online, directly from suppliers as well ...

Guest- Guest
Hi Guys, Which is the best procedure after putting on decals?
a
1. Give more couple of gloss coats.
2. Weather the aircraft
3. give the final coat.
b
1. Give more couple of gloss coats.
2. sand the aircraft
3. weather the aircraft.
4. give the final coat.
c
1. Give more couple of gloss coats.
2. weather the aircraft.
3. sand the aircraft
4. give the final coat.

AdriaN- Gold

- Posts : 925
Join date : 2009-08-06
Age : 36
Location : St Julians
after decalling i give one gloss coat, weathering and final coat.
i guess you will need many coats and sanding only if you have orange peel
i guess you will need many coats and sanding only if you have orange peel

Guest- Guest
after decal application, you should
1. wait for the decals to be completely dry, about a day is more than enough.
2. wipe off (with clean water) any residue from decal application, especially if you are using decal solutions.
3. apply a good gloss coating. How much layers depends on what you are using for gloss. This has to seal and protect the decals, so use your judgement
4. Sanding - as necessary, but be very careful over the decals as you can damage those easily, even with a good gloss coat.
5. apply weathering over glossy surface, e.g. panel line washes. If the paint is matt there is a high chance that the wash would get stuck to the paint.
6. apply the final coat to your like.
anyway this is more or less what I do.

AdriaN- Gold

- Posts : 925
Join date : 2009-08-06
Age : 36
Location : St Julians
i this heat  the decals will be dry... not in a day...but in 10 minutes!
ive often weathered (washes) over decals, it does no harm.

ive often weathered (washes) over decals, it does no harm.

Guest- Guest
Thanks mates for your help!
I sprayed a coat of gloss and it turned out matt with only minor patches of gloss.
What I did wrong?


I sprayed a coat of gloss and it turned out matt with only minor patches of gloss.
What I did wrong?


