+13
Noel Petroni
Paul Salomone
ascomt
Samwel18
Robert
slingshot392
Proximo41
iCocker
bcauchi
skyhigh
in nannu pec
Ray
Wayne
17 posters
He 162 Salamander 1/32

skyhigh- Best in Show

- Posts : 4654
Join date : 2009-07-30
Age : 63
Location : Qormi, Malta
- Post n°151
 Re: He 162 Salamander 1/32
Ejja Wayne , keep up the good so you can finish for telford............
Ray- Best in Show

- Posts : 6102
Join date : 2009-07-21
Age : 61
Location : Zurrieq MALTA
- Post n°152
 Re: He 162 Salamander 1/32
Keep it rolling Wayne 

bcauchi- Best in Show

- Posts : 4088
Join date : 2009-07-30
Age : 63
Location : St. Julian's
- Post n°153
 Re: He 162 Salamander 1/32
Hi Wayne the engine looks great. I cannot see the result of your washes in the pics but i will take your word for it. Don;t waste more time on it, you might revert to it when you are finished later on, it is exposed and you can still work on it and refine it when the model is done. but it is looking great and a far cry from when i saw it at the club. Good work. The wheel doors look great. i hope you solve the problem with the engine covers.

Wayne- Gold

- Posts : 1065
Join date : 2011-01-11
Age : 45
Location : Smack in the middle of the Med
- Post n°154
 Re: He 162 Salamander 1/32
Yes Brian, I will be putting the engine to one side for the time being. The next step is to mate the fuselage halves but before I can do that I have to finish off the gun bay. This is painted and ready for the cannon to go in. I'm waiting for MDC's Duralum manufacturer stamp decals to arrive because these have to be applied before fitting the cannon. I also sent for some Luftwaffe Cockpit placard decals (AirScale) to further embellish the cockpit.bcauchi wrote:Hi Wayne the engine looks great. I cannot see the result of your washes in the pics but i will take your word for it. Don;t waste more time on it, you might revert to it when you are finished later on, it is exposed and you can still work on it and refine it when the model is done. but it is looking great and a far cry from when i saw it at the club. Good work. The wheel doors look great. i hope you solve the problem with the engine covers.
I'm afraid I'm stuck until the decals arrive
_________________
Bench: Bv 141 B, Ju 87 G-2, Macchi C.205, Arado Ar.234
Stash: Ju87D-3, Bf 109 E-3, Bf109 F-4/trop, Bf 109 G-10, He219....
www.ScaleModelBench.com

bcauchi- Best in Show

- Posts : 4088
Join date : 2009-07-30
Age : 63
Location : St. Julian's
- Post n°155
 Re: He 162 Salamander 1/32
I have been through that wayne. That is one of the reasons i don;t build for competition any more. At this stage it is time for you to set yourself a schedule so that you can finish in time. If you want some of those aluminium manufacturers decals i will give you some. I don;t use them that often. See what you have left to do and set some targets for you to finish the model.

iCocker- Best in Show

- Posts : 3172
Join date : 2009-07-21
Age : 50
Location : Marsascala, Malta
- Post n°156
 Re: He 162 Salamander 1/32
Wayne, I am seeing a wonderful model being made but may I add some suggestion, enjoy the built and finish of the model, do not be fixated that you want to make a perfect replica ... there is no perfect model neither the BOS of any comp! And no matter the result take the suggestions from experts, and viewers and if you can talk to the judges ... good or bad as from there you learn.
Start enjoying the model mate and enjoy the finishing of it ... that is the experience not the medal!
Cerio and keep it up!
Ivan
Start enjoying the model mate and enjoy the finishing of it ... that is the experience not the medal!
Cerio and keep it up!
Ivan

Wayne- Gold

- Posts : 1065
Join date : 2011-01-11
Age : 45
Location : Smack in the middle of the Med
- Post n°157
 Re: He 162 Salamander 1/32
Thanks for the comments guys.
I am enjoying this build, even though sometimes I wish I hadn't gone into so much detail on what is practically my first model.
Brian, unless I receive the decals by the end of the week I will definitely take you up on your offer as I cannot waste any more time. (I would obviously replace the decals I use before handing them back over).
The paint job should not be too hard. These birds didn't have complicated camouflage, just the endless debate about the colour of the wings and the tail surfaces. Some say these were different colours, some say they were not. My guess is that there were versions of both. These things went from the drawing board to operational flight in a very short time and very late in the war when I suspect any regulations would have been thrown out the window!
Will keep you posted.
_________________

Bench: Bv 141 B, Ju 87 G-2, Macchi C.205, Arado Ar.234
Stash: Ju87D-3, Bf 109 E-3, Bf109 F-4/trop, Bf 109 G-10, He219....
www.ScaleModelBench.com

Wayne- Gold

- Posts : 1065
Join date : 2011-01-11
Age : 45
Location : Smack in the middle of the Med
- Post n°158
 Re: He 162 Salamander 1/32
Update.
Just received the cockpit placard decals
I will cheat a bit and use some of them on the engine as they are very similar.
Now if only the Duralumin decals and decal solutions would follow suit and arrive by tomorrow.....
Just received the cockpit placard decals
I will cheat a bit and use some of them on the engine as they are very similar.
Now if only the Duralumin decals and decal solutions would follow suit and arrive by tomorrow.....
_________________

Bench: Bv 141 B, Ju 87 G-2, Macchi C.205, Arado Ar.234
Stash: Ju87D-3, Bf 109 E-3, Bf109 F-4/trop, Bf 109 G-10, He219....
www.ScaleModelBench.com

skyhigh- Best in Show

- Posts : 4654
Join date : 2009-07-30
Age : 63
Location : Qormi, Malta
- Post n°159
 Re: He 162 Salamander 1/32
Come on Wayne , keep it up ..go go...

Ray- Best in Show

- Posts : 6102
Join date : 2009-07-21
Age : 61
Location : Zurrieq MALTA
- Post n°160
 Re: He 162 Salamander 1/32
Isa Wayne naqra ohra qallekk HUskyhigh wrote:Come on Wayne , keep it up ..go go...

Wayne- Gold

- Posts : 1065
Join date : 2011-01-11
Age : 45
Location : Smack in the middle of the Med
- Post n°161
 Re: He 162 Salamander 1/32
MDC Duralumin Manufacturer stamp decals arrived today!
Perfect timing for the weekend
Skyhigh.... here's a tough question.... I need to find out the grade (at least the thickness) of the aluminium used in the 162's gun bay . The decals provide stamps for 1mm, 0.9mm and 6mm duralumin sheets.
I will have a look through the Classic Publications book tonight to see if there's any mention of it...
If I find nothing, I will just go with the one that looks best
P.S.
I still have not received the decal solutions, but I was going to apply this decal anyway given that it's going on a very small, flat area. What do you guys think? I haven't applied a decal since I was a kid so It's practically new territory for me.
Perfect timing for the weekend
Skyhigh.... here's a tough question.... I need to find out the grade (at least the thickness) of the aluminium used in the 162's gun bay
I will have a look through the Classic Publications book tonight to see if there's any mention of it...
If I find nothing, I will just go with the one that looks best
P.S.
I still have not received the decal solutions, but I was going to apply this decal anyway given that it's going on a very small, flat area. What do you guys think? I haven't applied a decal since I was a kid so It's practically new territory for me.
_________________

Bench: Bv 141 B, Ju 87 G-2, Macchi C.205, Arado Ar.234
Stash: Ju87D-3, Bf 109 E-3, Bf109 F-4/trop, Bf 109 G-10, He219....
www.ScaleModelBench.com

bcauchi- Best in Show

- Posts : 4088
Join date : 2009-07-30
Age : 63
Location : St. Julian's
- Post n°162
 Re: He 162 Salamander 1/32
If you have some future use that NOT decal solution. It will also look better since you will be applying those decals over bare metal finish areas so you will not ruin the aluminium effect with the decal solution.

Wayne- Gold

- Posts : 1065
Join date : 2011-01-11
Age : 45
Location : Smack in the middle of the Med
- Post n°163
 Re: He 162 Salamander 1/32
I'm ready to mate the fuselage halves of the aircraft but as you can see I'm having problems with weighting the nose down

The only way I managed to keep it level was by adding excessive amounts of lead pellets which resulted in them being visible through the openings in the gun compartment.

Wrapping the lead in black milliput might make them less visible but I would like to avoid having anything showing through.
I will try to cram as much as I can to the cockpit bulkhead and see how it goes.

The only way I managed to keep it level was by adding excessive amounts of lead pellets which resulted in them being visible through the openings in the gun compartment.

Wrapping the lead in black milliput might make them less visible but I would like to avoid having anything showing through.
I will try to cram as much as I can to the cockpit bulkhead and see how it goes.
_________________

Bench: Bv 141 B, Ju 87 G-2, Macchi C.205, Arado Ar.234
Stash: Ju87D-3, Bf 109 E-3, Bf109 F-4/trop, Bf 109 G-10, He219....
www.ScaleModelBench.com

bcauchi- Best in Show

- Posts : 4088
Join date : 2009-07-30
Age : 63
Location : St. Julian's
- Post n°164
 Re: He 162 Salamander 1/32
Wayne, you can try to fill in the front tyre as well. Every bit helps. If the worst comes to the worst, don;t panic, just glue the aircraft to the base. No problem. Also, if you flatten a bit the main tyres, that will help too. It will be more difficult for the aircraft to tilt back. Flatten also a bit the front tyre. it will lower the nose a bit. When things are critical every bit helps. How about under the seat, or even behind the seat to the front of the engine, that is still forward of the aircraft's C of G so it will help too.

Wayne- Gold

- Posts : 1065
Join date : 2011-01-11
Age : 45
Location : Smack in the middle of the Med
- Post n°165
 Re: He 162 Salamander 1/32
thanks for the tips. I will in fact be using a set of flattened resin wheels that came with the resin seat.
Also i will try and cram as much as i can behind the bulkhead as you suggest. The instruction sheet says it will require 45g, so wish me luck:D
Also i will try and cram as much as i can behind the bulkhead as you suggest. The instruction sheet says it will require 45g, so wish me luck:D
_________________

Bench: Bv 141 B, Ju 87 G-2, Macchi C.205, Arado Ar.234
Stash: Ju87D-3, Bf 109 E-3, Bf109 F-4/trop, Bf 109 G-10, He219....
www.ScaleModelBench.com

Wayne- Gold

- Posts : 1065
Join date : 2011-01-11
Age : 45
Location : Smack in the middle of the Med
- Post n°166
 Re: He 162 Salamander 1/32
Airframe successfully weighted:


_________________

Bench: Bv 141 B, Ju 87 G-2, Macchi C.205, Arado Ar.234
Stash: Ju87D-3, Bf 109 E-3, Bf109 F-4/trop, Bf 109 G-10, He219....
www.ScaleModelBench.com

skyhigh- Best in Show

- Posts : 4654
Join date : 2009-07-30
Age : 63
Location : Qormi, Malta
- Post n°167
 Re: He 162 Salamander 1/32

bcauchi- Best in Show

- Posts : 4088
Join date : 2009-07-30
Age : 63
Location : St. Julian's
- Post n°168
 Re: He 162 Salamander 1/32
Lovely work Wayne, I love the plumbing on the undercarriage legs, very elegant. Keep it up!!!
in nannu pec- Best in Show

- Posts : 2019
Join date : 2009-07-23
Age : 76
Location : Qawra Malta
- Post n°169
 Re: He 162 Salamander 1/32
Lovely work Wayne....
in nannu
in nannu

Ray- Best in Show

- Posts : 6102
Join date : 2009-07-21
Age : 61
Location : Zurrieq MALTA
- Post n°170
 Re: He 162 Salamander 1/32
Very well weighted Wayne 
Hope you are counting ALL the Wires as you will be sitting for the Final Exam at the end of this project infront of HIM
  MarKo
MarKo 
Hope you are counting ALL the Wires as you will be sitting for the Final Exam at the end of this project

Wayne- Gold

- Posts : 1065
Join date : 2011-01-11
Age : 45
Location : Smack in the middle of the Med
- Post n°171
 Re: He 162 Salamander 1/32
Fuselage is glued together... hope I haven't left anything out 
Next step is to fiddle around with the engine covers and hinges to make them fit to the modified engine, then I'll stick the wings and tail on and start filling and sanding the seams.
Will post progress pics later on tonight.
Next step is to fiddle around with the engine covers and hinges to make them fit to the modified engine, then I'll stick the wings and tail on and start filling and sanding the seams.
Will post progress pics later on tonight.
_________________

Bench: Bv 141 B, Ju 87 G-2, Macchi C.205, Arado Ar.234
Stash: Ju87D-3, Bf 109 E-3, Bf109 F-4/trop, Bf 109 G-10, He219....
www.ScaleModelBench.com

in nannu pec- Best in Show

- Posts : 2019
Join date : 2009-07-23
Age : 76
Location : Qawra Malta
- Post n°172
 Re: He 162 Salamander 1/32
Go Wayne go !!!! finish it.  ....ejja ha tellaha mieghek
In Nannu8)
In Nannu8)

Wayne- Gold

- Posts : 1065
Join date : 2011-01-11
Age : 45
Location : Smack in the middle of the Med
- Post n°173
 Re: He 162 Salamander 1/32
After fiddling with the kit's engine cover hinges, it was pretty apparent that they were way too thick to sit beneath the modified engine. Even after sanding.
In the end I decided to swap them for foil replacements:
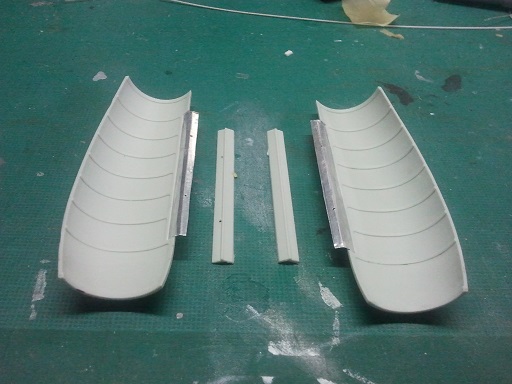
The following picture illustrates the difference in thickness between the old and new hinges:

The covers now fit snugly... problem solved
In the end I decided to swap them for foil replacements:

The following picture illustrates the difference in thickness between the old and new hinges:

The covers now fit snugly... problem solved
_________________

Bench: Bv 141 B, Ju 87 G-2, Macchi C.205, Arado Ar.234
Stash: Ju87D-3, Bf 109 E-3, Bf109 F-4/trop, Bf 109 G-10, He219....
www.ScaleModelBench.com

Wayne- Gold

- Posts : 1065
Join date : 2011-01-11
Age : 45
Location : Smack in the middle of the Med
- Post n°174
 Re: He 162 Salamander 1/32
Finishing off the gun bay:


Ammunition paint is drying... once that is done the gun can be glued to place and the gun bay will be complete.


Ammunition paint is drying... once that is done the gun can be glued to place and the gun bay will be complete.
_________________

Bench: Bv 141 B, Ju 87 G-2, Macchi C.205, Arado Ar.234
Stash: Ju87D-3, Bf 109 E-3, Bf109 F-4/trop, Bf 109 G-10, He219....
www.ScaleModelBench.com

Wayne- Gold

- Posts : 1065
Join date : 2011-01-11
Age : 45
Location : Smack in the middle of the Med
- Post n°175
 Re: He 162 Salamander 1/32
Finishing touches to the cockpit...
Decals:


And the most challenging (believe it or not) fiddly bits of detail yet... the shrouds covering the gun barrels at the base of the bulkhead.
Getting these aligned and looking properly was a royal pain

Decals:


And the most challenging (believe it or not) fiddly bits of detail yet... the shrouds covering the gun barrels at the base of the bulkhead.
Getting these aligned and looking properly was a royal pain

_________________

Bench: Bv 141 B, Ju 87 G-2, Macchi C.205, Arado Ar.234
Stash: Ju87D-3, Bf 109 E-3, Bf109 F-4/trop, Bf 109 G-10, He219....
www.ScaleModelBench.com

