+12
Jerzy Ciupek
AdriaN
Dottore
Maxi_Model
Scirocco
Paul Salomone
Wayne
ascomt
in nannu pec
Ray
iCocker
skyhigh
16 posters
Beech King Air
bcauchi- Best in Show
- Posts : 4088
Join date : 2009-07-30
Age : 63
Location : St. Julian's
- Post n°51
Re: Beech King Air
The promised photos. The first shows a very crude setup to try to obtain an equal and accurate 6 deg. dihedral for the wings. The result is a compromise due to the very bad way in which the engine nacelles are represented. They are twisted totally in the opposite direction and sticking to the 6 deg. would make it impossible to align the engines in the vertical direction, so the result is as near as i could get but obviously not spot on. In the other pics the wings are glued in place. I am now working on the joints.
Ray- Best in Show
- Posts : 6102
Join date : 2009-07-21
Age : 61
Location : Zurrieq MALTA
- Post n°52
Re: Beech King Air
Don't be too hard on yourself Bri, you've done SO WELL in the DIRE circumstances
bcauchi- Best in Show
- Posts : 4088
Join date : 2009-07-30
Age : 63
Location : St. Julian's
- Post n°53
Re: Beech King Air
Thanks Ray, oh let those lovely rainy afternoons come back, a true modeller's dream.
skyhigh- Best in Show
- Posts : 4654
Join date : 2009-07-30
Age : 63
Location : Qormi, Malta
- Post n°54
Re: Beech King Air
Great work Brian ..they are realy taken shape now ...
skyhigh- Best in Show
- Posts : 4654
Join date : 2009-07-30
Age : 63
Location : Qormi, Malta
- Post n°55
Re: Beech King Air
Gordon wrote:www.youtube.com/watch?v=SHl3L5VajOc&feature=player_embedded
Welldone Gordon , what a good feature ...
Scirocco- Bronze
- Posts : 219
Join date : 2010-05-07
Age : 56
Location : Birzebbuga
- Post n°56
Re: Beech King Air
Nice work Brian, and a well deserved aircraft on any Maltese modeller's shelves. Pity that there is no decent kit of the Kingair, considering it is used so widely both in civil and military roles. Hope to see them soon finished!
in nannu pec- Best in Show
- Posts : 2019
Join date : 2009-07-23
Age : 76
Location : Qawra Malta
- Post n°57
Re: Beech King Air
Amen to that Brian...sick and fed up of this bloody heat.....can't spend more than 15 minutes in my workshop....too stuffy...and to add insult to injury...my faithful airbrush compressor which has given me 35 years of loyal service has just died ....so modelling on hold at the moment...bcauchi wrote:Thanks Ray, oh let those lovely rainy afternoons come back, a true modeller's dream.
in nannu
slingshot392- Silver
- Posts : 467
Join date : 2010-02-19
Age : 62
Location : Minnesota, USA
- Post n°58
Re: Beech King Air
This is coming along really nicely Brian, especially considering how much work you had to put into the wings to straighten them out. Don't worry too much about getting the correct angle on the wings, at that small of a scale, I don't know if it would even be that noticeable? Is that silver paint or silver wax on one of the wings?
bcauchi- Best in Show
- Posts : 4088
Join date : 2009-07-30
Age : 63
Location : St. Julian's
- Post n°59
Re: Beech King Air
Hi Brad, that is rubnbuff. I really went to town with the polish as an experiment to see how close to chrome/silver i can get it and i was pretty satisfied. Used that wing as a test platform for my upcoming bike build. At the same time, the wax shows up any minute imperfections and scratches. And believe me, there were a lot of those.
bcauchi- Best in Show
- Posts : 4088
Join date : 2009-07-30
Age : 63
Location : St. Julian's
- Post n°60
Re: Beech King Air
Next up was the very obvious large radar housing on the underside of the fuselage. This had to be scratchbuilt. A very frustrating process indeed. I first tried making it out of milliput but the blasted thing just did not want to dry for some strange reason, it is still not rock hard today, after a week. Obviously it was discarded. I then produced the component from plastic. Glued blocks of plastic filed and sanded to shape. It is basically made of three parts.
Here you can see the first attempt using milliput
And finally, here is the part in place on the underside of the aircraft.
By the way, any suggestions for masking the round windows on the side of the fuselage? i need to find the perfect round shapes to cover them up. Have been unsuccessful up to now and i need to start painting soon. thanks.
Paul Salomone- Gold
- Posts : 655
Join date : 2011-07-08
Age : 59
Location : MANIKATA MALTA
- Post n°61
Beech King Air
Hello Brian,
Well done mate - it's always a pleasure viewing your projects.
Cheers.
Well done mate - it's always a pleasure viewing your projects.
Cheers.
skyhigh- Best in Show
- Posts : 4654
Join date : 2009-07-30
Age : 63
Location : Qormi, Malta
- Post n°62
Re: Beech King Air
Insomma Brian , your the one man job.....
slingshot392- Silver
- Posts : 467
Join date : 2010-02-19
Age : 62
Location : Minnesota, USA
- Post n°63
Re: Beech King Air
That really looks nice and looks like some tiny detail to sand all that.
A couple suggestions for taping the windows. When I have taped dome sections, you can either try getting really narrow taped and use a whole lot of pieces and just keep working your way around the window starting at the top and laying each piece next to each other from the edge of the window to the middle. Or, cut a wide piece into a bunch of little strips.
You would have to test this on some practice pieces, but you could try some white glue and then see how easily it peels off, you could also tasked putting a wet cloth or paper towel against the glue so it really softens up or melts before you try to remove it to see if that's easier.
Same thing with testing, but maybe rubber cement would work? I have read where some guys use it in place of liquid mask, but I've never tried that.
Dottore- Gold
- Posts : 1388
Join date : 2009-07-21
Age : 46
Location : Tarxien, Malta
- Post n°64
Blue tack....
or maskol for the edges...and the centre blu tack....
Dottore
Dottore
bcauchi- Best in Show
- Posts : 4088
Join date : 2009-07-30
Age : 63
Location : St. Julian's
- Post n°65
Re: Beech King Air
I had maskol in mind but never used it. How do I get it to set in a perfect circle? That is my problem. I was thinking of a round small diameter punch and die set maybe i can punch out masking tape circles.The diameter of the round windows is roughly 4mm.
Guest- Guest
- Post n°66
Re: Beech King Air
bcauchi wrote:I had maskol in mind but never used it. How do I get it to set in a perfect circle? That is my problem. I was thinking of a round small diameter punch and die set maybe i can punch out masking tape circles.The diameter of the round windows is roughly 4mm.
I rarely use anything else than tape or masking clear parts. The punch and die method would work for the cabin windows since they are round but not ideal for the dome since it is oval. I suggest you start with very thin strips 90deg to the fusalage and apply it spirally overlapping it just until you have some space covered, then use maskol or whatever to mask the remaining part. You would have to use a pointed tweezer to do this as you would not the be able to do this bare hand.
I have another tip, but this one is a bit risky - a brand new no.11 blade, cover the whole thing with tape then cut with the blade at the base. As I said it is risky as a slip could prove fatal!! (for the model). I usually do this when I have cabin windows given that there is some form of guidance that could be used for the blade.
It is not the easiest job, but it should not be a problem.
Last edited by J.Fenech on Thu Aug 09, 2012 7:03 pm; edited 1 time in total
smallia- Gold
- Posts : 670
Join date : 2009-07-21
Age : 60
Location : G'Mangia
- Post n°67
Re: Beech King Air
This is way cool. Really can't wait for this one
Steve
Steve
slingshot392- Silver
- Posts : 467
Join date : 2010-02-19
Age : 62
Location : Minnesota, USA
- Post n°68
Re: Beech King Air
One other thing you could use it is the Silly Putty I sent you, it can be rolled out pretty thin, although I wouldn't go paperthin with it. I've found it is easiest to cut with a wet knife blade. What's nice about it, after you are done painting, you can remove it and put it back on the ball of Silly Putty and work it back in, for some reason, the paint doesn't matter.
Ray- Best in Show
- Posts : 6102
Join date : 2009-07-21
Age : 61
Location : Zurrieq MALTA
- Post n°69
Re: Beech King Air
bcauchi wrote:I had maskol in mind but never used it. How do I get it to set in a perfect circle? That is my problem. I was thinking of a round small diameter punch and die set maybe i can punch out masking tape circles.The diameter of the round windows is roughly 4mm.
I would go for the punch & die set unquestioned......stick a strip of Tamiya masking tape on a strip of thin plastic sheet so you punch thru the plastic & preserve the adhesiveness of the Tamiya masking tape......then pull it off with a surgical blade so you won't fret the edges when you grip it with the tweezers.
I used this method many moons ago when I painted my Assyrian King......the perfect round pattern at the back was achieved this way
slingshot392- Silver
- Posts : 467
Join date : 2010-02-19
Age : 62
Location : Minnesota, USA
- Post n°70
Re: Beech King Air
I sent this link to Brian at his home and he really liked it, so I thought I would put the link year as well. Such an easy way to make circles out of Silly Putty or tape or just about anything else.
http://cs.scaleautomag.com/sca/tips_techniques/f/8/t/106628.aspx
bcauchi- Best in Show
- Posts : 4088
Join date : 2009-07-30
Age : 63
Location : St. Julian's
- Post n°71
Re: Beech King Air
More pics of the work i am doing on these babies. Here is the completion of the radar fairings/covers.
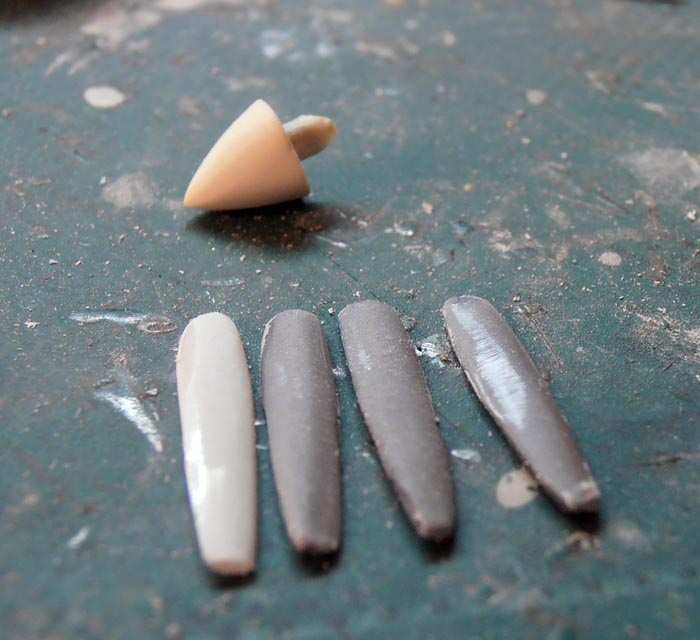
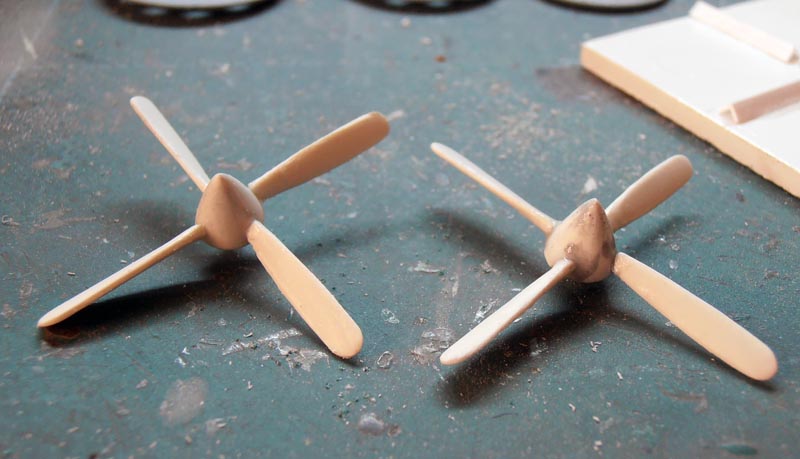
Next up are the props. The first photo is of one of the kit props, needless to say it is trash just like the rest of these kits. The props did not even fit on the engine nacelles they were oversized and irregular. First thing i did was loose all the blades, then i put them in place on the engines and sanded them till they mated with the rest of the engine nacelles. The blades were produced individually, home made from scrap plastic, mostly reshaped prop blades from the rubbish box. A very simple jig was made to glue them in place with some degree of accuracy. The result is far from satisfactory but given the crap level of the kits themselves, they are acceptable. Probably, when painted they will not look that bad......well i hope so anyway. Next up is the undercarriage, this is going to be totally scratchbuilt since the kit parts have nothing to do with the actual plane parts. I have lots of photos but have been told not to make them public so you just have to take my word for it that i am working with reference to the real thing.
bcauchi- Best in Show
- Posts : 4088
Join date : 2009-07-30
Age : 63
Location : St. Julian's
- Post n°72
Re: Beech King Air
Forgot to tell you that the kit props were 3 bladed whilst those on our aircraft are 4 bladed.
in nannu pec- Best in Show
- Posts : 2019
Join date : 2009-07-23
Age : 76
Location : Qawra Malta
- Post n°73
Re: Beech King Air
prosit Brian...impressive work as always !
in nannu
in nannu
skyhigh- Best in Show
- Posts : 4654
Join date : 2009-07-30
Age : 63
Location : Qormi, Malta
- Post n°74
Re: Beech King Air
[quote="in nannu pec"]prosit Brian...impressive work as always !
in nannu[/quot
Make it X 2 welldone...
in nannu[/quot
Make it X 2 welldone...
Ray- Best in Show
- Posts : 6102
Join date : 2009-07-21
Age : 61
Location : Zurrieq MALTA
- Post n°75
Re: Beech King Air
Kepp at them at will Bri