+12
Luke
William
Alex Kontiveis
jojjemannen
Dottore
danchircop
slingshot392
Noel Petroni
AdriaN
bcauchi
Joseph
alexbb
16 posters
My production line

Guest- Guest
- Post n°151
 Re: My production line
The camo looked nicely applied. It is quite possible that the mishap was because the base color this case silver was gloss and the paint did not adhere properly to the gloss color. Keep up the work.

Guest- Guest
- Post n°152
 Re: My production line
Shouldn't have anything to do with the aluminum base coat. I have done my last 20+ models that way. I think there my have been some heavy oily residue left on the plan from handling during construction. The problem areas were very sporadic and small in size and seemed to be on pieces I had to hold in place for a while to let the glue to set. That being said on the upper surfaces gave me trouble and that was mostly on one color, may have been a bad paint form being to old. The model will get a bath before going back out to the paint booth. So we will see what happens. even if it comes out multiple shade that will be fine as this aircraft were used ans abused in Vietnam.

Guest- Guest
- Post n°153
 Re: My production line
Meanwhile I have also been working on my TSR-2 model. Here is the cockpit to date...


Then these are the ejection seats. I am using a picture of the eduard seatbelt set create my own out of tape and sharpie pen. I am waiting for the yellow paint to dry so I can pen the black stripes on the ejection handle.


This is how i made the middle ejection handle. I melted a small plastic rod around my second favorite tool the "Pointy thing" (second only to the #11 xacto knife). When the plastic was hot enough is would drape over the pointy thing and I would press it together with my fingers then cut off the loop for the ejection handle.


Then these are the ejection seats. I am using a picture of the eduard seatbelt set create my own out of tape and sharpie pen. I am waiting for the yellow paint to dry so I can pen the black stripes on the ejection handle.


This is how i made the middle ejection handle. I melted a small plastic rod around my second favorite tool the "Pointy thing" (second only to the #11 xacto knife). When the plastic was hot enough is would drape over the pointy thing and I would press it together with my fingers then cut off the loop for the ejection handle.


Guest- Guest
- Post n°154
 Re: My production line
Looks like I will have to strip the paint from my Thud again. I tried repainting it tonight but watched as the paint would crack while painting. I had washed the model in both soap and water and denatured alcohol to get rid of any oily spots, remixed the paint twice and cleaned out the tips 4 times while painting, still a no go on the one color. I think the paint as outlasted itself and will have to pick a new bottle the next time I can get to the hobby shop. (right now about 3 weeks away... &%*#$*& !!)

Guest- Guest
- Post n°155
 Re: My production line
Got to the paint booth today,
Got half of the AR-234b painted...


Got my F-4 and F-104 cockpits base coat on them today...

Also got my HE-162 painted....


He also got his wheels today....
and BTW this is what I am calling a paint booth....

It is a work bench in the garage, I stand there and spray the models and get soaking wet with sweat doing nothing!
Got half of the AR-234b painted...


Got my F-4 and F-104 cockpits base coat on them today...

Also got my HE-162 painted....


He also got his wheels today....
and BTW this is what I am calling a paint booth....

It is a work bench in the garage, I stand there and spray the models and get soaking wet with sweat doing nothing!

AdriaN- Gold

- Posts : 925
Join date : 2009-08-06
Age : 36
Location : St Julians
- Post n°156
 Re: My production line
The incommon decals on the left page are really putting off! 


Guest- Guest
- Post n°157
 Re: My production line
For a practice in frustration I am going to try and build an avionics bay for the TSR2.
This is the bay itself, all the little white things in front are the "boxes" I am planning to put in it. I have some old PE (in background) that I am planning to steal pieces from as well.

If it turns out well I will have to cut out this section of the fuselage to place the bay behind. (I have also figured out there is a conflict with the wheel well in the model that doesn't seem to be there in the real thing :mad:)

If all goes well this is the look I am going after...

(at this point I wake up from my dream )
)
This is the bay itself, all the little white things in front are the "boxes" I am planning to put in it. I have some old PE (in background) that I am planning to steal pieces from as well.

If it turns out well I will have to cut out this section of the fuselage to place the bay behind. (I have also figured out there is a conflict with the wheel well in the model that doesn't seem to be there in the real thing :mad:)

If all goes well this is the look I am going after...

(at this point I wake up from my dream

Guest- Guest
- Post n°159
 Re: My production line
I also have been working on my HE-162. I have some touchup painting to do, then it will be gloss coat and decals.


 [IMG]
[IMG]


Now lets see how many time I can break off the gun bay door...


 [IMG]
[IMG]

Now lets see how many time I can break off the gun bay door...

Guest- Guest
- Post n°160
 Re: My production line
The AR-234b is now ready for gloss coat and decals.... only problem...just ran out of gloss coat on the HE-162


Guest- Guest
- Post n°161
 Re: My production line
This model is now decaled and now awaits more gloss coat...


Aldo- Bronze

- Posts : 293
Join date : 2009-07-23
Age : 67
Location : Birkirkara, MALTA
- Post n°162
 Re: My production line
Nice work but why did you choose that sci-fi scheme for the AR234?. That was published as an imaginary version for the projected nightfighter but it was never really used as the P series never made it before the end of WWII. The only night fighters used by Sommer and a couple others were standard 70/71 and/or 81/82 machines with the most, a blacked out lower front canopy.

Guest- Guest
- Post n°163
 Re: My production line
Aldo wrote:Nice work but why did you choose that sci-fi scheme for the AR234?. That was published as an imaginary version for the projected nightfighter but it was never really used as the P series never made it before the end of WWII. The only night fighters used by Sommer and a couple others were standard 70/71 and/or 81/82 machines with the most, a blacked out lower front canopy.
Actually it was the commanders aircraft flown by Kurt Bonow out of Oranienburg, Germany in 45. I choose it because I didn't want to do the tradition splinter scheme.

slingshot392- Silver

- Posts : 467
Join date : 2010-02-19
Age : 62
Location : Minnesota, USA
- Post n°164
 Re: My production line
You're doing a great job on all of these! I've got to get moving and actually finish one of mine!

Guest- Guest
- Post n°165
 Re: My production line
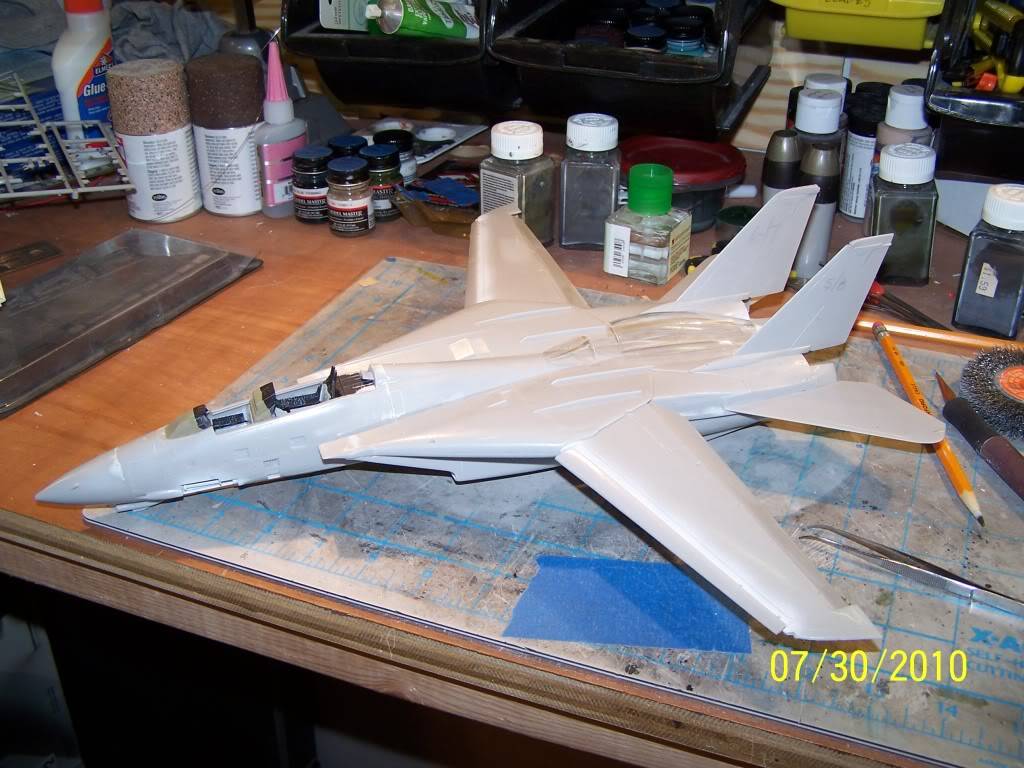
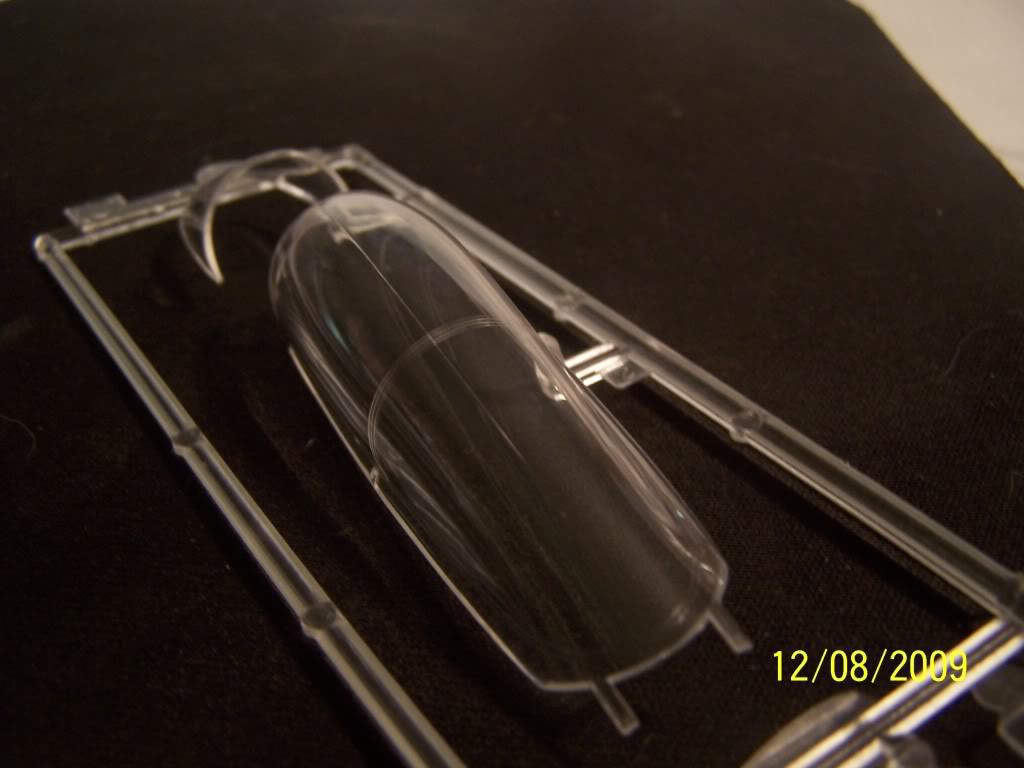
The F-14 is about an hour of work away front the paint booth. Just scraped off a seam down the middle if the cockpit canopy and now have to wait a day so I can mask it. (it is sitting on the rear of the airplane) That will take about a hour, then she will be ready for the paint booth...


Guest- Guest
- Post n°166
 Re: My production line
I have done 2 large Hasagawa jet fighters this one, the F-14 and the F-15. Both had a seam down the middle of the cockpit. This is how I fixed them both. In this example it is the F-15 cockpit that is being fixed
I was looking over the F-15 tonight and noticed a seam running down the middle of the canopy :censored:


So here is how I fixed it....
First here are the tools I used, #11 x-acto knife, tri-grit sanding stick and future floor polish (now pledge floor wax)

First I started by scraping down the seam with the #11 blade edge. You can tell which side is higher by the straight line that appears (look at the bottom edge of the canopy in the picture below)

Once you finish this step it will look like this...

I then sand it down with the rough grit on the tri grit sanding stick and it looks like this when done...

Next I use the middle grit to start the buffing out of the scratches...

then I use the buffing side of the sanding stick to get to this stage...

When all that is done to my satisfaction I coat it in future...

and unless you know exactly were to look the seam is gone...
I was looking over the F-15 tonight and noticed a seam running down the middle of the canopy :censored:


So here is how I fixed it....
First here are the tools I used, #11 x-acto knife, tri-grit sanding stick and future floor polish (now pledge floor wax)

First I started by scraping down the seam with the #11 blade edge. You can tell which side is higher by the straight line that appears (look at the bottom edge of the canopy in the picture below)

Once you finish this step it will look like this...

I then sand it down with the rough grit on the tri grit sanding stick and it looks like this when done...

Next I use the middle grit to start the buffing out of the scratches...

then I use the buffing side of the sanding stick to get to this stage...

When all that is done to my satisfaction I coat it in future...

and unless you know exactly were to look the seam is gone...

Luke- Bronze

- Posts : 205
Join date : 2010-01-15
Location : Haz-Zebbug
- Post n°168
 Very nice job ..
Very nice job mate , Love the Paint scheme of the F-14 

Aldo- Bronze

- Posts : 293
Join date : 2009-07-23
Age : 67
Location : Birkirkara, MALTA
- Post n°169
 Re: My production line
Actually it was the commanders aircraft flown by Kurt Bonow out of Oranienburg, Germany in 45. I choose it because I didn't want to do the tradition splinter scheme.[/quote]
Sorry to disappoint you but Bonow's aircraft was in late war greens not in your greys. Admittedly, the mottled scheme which originated in the Aces books looks very attractive but it is purely fictional. If you like, I will post photos of Bonow's aircraft.

Guest- Guest
- Post n°170
 Re: My production line
I have started work on a model I started 2 years ago and quickly got disappointed in.. (a brief history follows)

I thought this would be a neat kit to have on my shelves. Turns out it was a horrendous mistake...
the poor pilot has some serious "sink hole" and flash problems on him (not to mention the lackluster details)


Now the cockpit started out OK...

but went quickly downhill when you realized that was it, no foot wells, no back panels, just a floor and some instrumentation...
Next was the wheel wells and it didn't get better. In fact there were missing locator pin holes and holes that didn't need to be there at all!

I was thinking at this time it can't get worse... wrong...
There were the air intakes halves, notice the big injection pins located right at the mouth of the intake!!

after sanding those down I looked at the decals... mistake, they are cr@p! You should be able to read everything on 1/32 scale decals, I can read most 1/48 scale decals, but these?


needless to say I was ... er... pissed at the whole experience and put the thing away on the shelf
and there is sat on my shelf for the next 2 years...

I thought this would be a neat kit to have on my shelves. Turns out it was a horrendous mistake...
the poor pilot has some serious "sink hole" and flash problems on him (not to mention the lackluster details)


Now the cockpit started out OK...

but went quickly downhill when you realized that was it, no foot wells, no back panels, just a floor and some instrumentation...
Next was the wheel wells and it didn't get better. In fact there were missing locator pin holes and holes that didn't need to be there at all!

I was thinking at this time it can't get worse... wrong...
There were the air intakes halves, notice the big injection pins located right at the mouth of the intake!!

after sanding those down I looked at the decals... mistake, they are cr@p! You should be able to read everything on 1/32 scale decals, I can read most 1/48 scale decals, but these?


needless to say I was ... er... pissed at the whole experience and put the thing away on the shelf
and there is sat on my shelf for the next 2 years...

Guest- Guest
- Post n°171
 Re: My production line
To continue the saga I got a big case of the stupids and pulled down the F-16XL to work on some more...
Step 1 clean out flash and molding FUBARs on air intake mouth...


Step 2 cry over sink holes in landing gear and struts...


Step 3 Realize the company skimped on the instructions and the step 3 is for the standard version F-16 and not the XL you are building...

Step 4 discover that the two tail haves don't fit well. The smaller half ends up inside the larger half in a recess,

shim to proper thickness....
Step 5 Glue, tape, force fit, superglue and clamp air intake together...

Step 6 discover that intake doesn't fit lower half of fuselage....


Step 7 sand, cut, test fit, sand, test fit, cuss, sand, test fit, shim, test fit, shim some more, superglue, clamp, fill holes and gaps, go watch TV to calm down....


next will be the cockpit installations and upper and lower halves mating. right now more TV...
Step 1 clean out flash and molding FUBARs on air intake mouth...


Step 2 cry over sink holes in landing gear and struts...


Step 3 Realize the company skimped on the instructions and the step 3 is for the standard version F-16 and not the XL you are building...

Step 4 discover that the two tail haves don't fit well. The smaller half ends up inside the larger half in a recess,

shim to proper thickness....
Step 5 Glue, tape, force fit, superglue and clamp air intake together...

Step 6 discover that intake doesn't fit lower half of fuselage....


Step 7 sand, cut, test fit, sand, test fit, cuss, sand, test fit, shim, test fit, shim some more, superglue, clamp, fill holes and gaps, go watch TV to calm down....


next will be the cockpit installations and upper and lower halves mating. right now more TV...

AdriaN- Gold

- Posts : 925
Join date : 2009-08-06
Age : 36
Location : St Julians
- Post n°172
 Re: My production line
what make is it?

Guest- Guest
- Post n°173
 Re: My production line
AdriaN wrote:

what make is it?
Ace Hobby Kit.... probably not in business any longer...

clioguy- Bronze

- Posts : 258
Join date : 2009-07-23
Age : 45
Location : Marsaskala, Malta
- Post n°174
 Re: My production line
bet it was cheap though!

Guest- Guest
- Post n°175
 Re: My production line
clioguy wrote:bet it was cheap though!
Lets put it this way, there is a reason all the other 1/32 scale kits are 4 to 5 more expensive...


