i have said it before and will say it again......and i thought i was the only mentaly unstable one around but as they say two is company....
+28
Rob Wood
Samwel18
el manolo
5Nige
Robert
jojjemannen
tiking
Noel Petroni
olivermifsud
Iain
alexbb
smallia
Proximo41
Haratio Fales
RayCaruana
Cyril.
Wayne
Tancred
Dottore
ascomt
skyhigh
in nannu pec
Aldo
iCocker
Ray
David
bcauchi
Paul Salomone
32 posters
1:72 Scale German WW2 Heavy Battle Cruiser K.M.S. Scharnhorst 1943

alexbb- Best in Show

- Posts : 1710
Join date : 2009-07-21
Age : 63
i know its a bit late now but if im correct eergreen produce various type of treadplate in various sizes.
i have said it before and will say it again......and i thought i was the only mentaly unstable one around but as they say two is company....
i have said it before and will say it again......and i thought i was the only mentaly unstable one around but as they say two is company....
Paul Salomone- Gold

- Posts : 655
Join date : 2011-07-08
Age : 59
Location : MANIKATA MALTA
Hi Guys, 
Many thanks for your support.
Alex, I have checked the Evergreen site, and downloaded their general catalogue. They do not have the German pattern. There are other companyies of course and have checked them as well. They do diamond patterned thread plates, suitable for US and IJN navy, and in 1:100 or 1:96, and 1:150.
That means more work for me.
Cheers.

alexbb- Best in Show

- Posts : 1710
Join date : 2009-07-21
Age : 63
Paul Salomone wrote:Hi Guys,
Many thanks for your support.
Alex, I have checked the Evergreen site, and downloaded their general catalogue. They do not have the German pattern. There are other companyies of course and have checked them as well. They do diamond patterned thread plates, suitable for US and IJN navy, and in 1:100 or 1:96, and 1:150.
That means more work for me.
Cheers.
as if life is not complicated enough we have to complicate it even more. but at least the satifaction once the model is finished will make it all worth while.

Paul Salomone- Gold

- Posts : 655
Join date : 2011-07-08
Age : 59
Location : MANIKATA MALTA
Good evening Noel,
Please excuse my for missing out your query. First of all, for those who are not aquanted with ships and planking, it's good to give a bit of explanation. The period ships, also known as sailing ships or vessels, and even todays ships, have their decks covered with timber strips. This is called planking, and is used mainly to give degree of protection to the steel structure, as wood is a very good insulator. The main timber used is teak, and cut in planks of 6" or 8" width by some 13 feet or 20 feet in length. These are assembled in a special sequence, as to enhance strength and resistivity to expansion. The joints and the openings between the said planks are filled in with tar as used in the olden days or a similar substitute.
Now to create those linings, I first of course finish off the whole area to be planked, Than sand down to the desired finish. Then the whole area is stain washed, to get that teakish look, leave it to dry and sand off a bit using a size 250 sand paper. After, it's back to the airbrush to give it a coat of clear satin finish varnish. It would take 3 coats at least, sand off to obtain a clean surface. Now one can either produce the linings with a 0.25mm permanent marker, or apply washes. But washes may be a bit distotive, so I prefer to use the permanent marker and apply the washes later on. Apply a thin coat of satin clear varnish, This will seal off the permanent marker. Apply wahses as required to create a soft weathering and enhance the detailing. Once ready, you end up with some good detailed planking.
Cheers.

tiking- Commended

- Posts : 51
Join date : 2012-09-24
This is just simply a Masterpiece. You must have a lot of time on your hands. 

Ray- Best in Show

- Posts : 6102
Join date : 2009-07-21
Age : 61
Location : Zurrieq MALTA
Crazy? No 
Talented? Yes?
Sure Crazy no? Yes sure Crazy

Sure Talented? More then anticipated Yes
Yes 

Talented? Yes?
Sure Crazy no? Yes sure Crazy
Sure Talented? More then anticipated
 Yes
Yes 
Paul Salomone- Gold

- Posts : 655
Join date : 2011-07-08
Age : 59
Location : MANIKATA MALTA
Hello Tiking, 
Many thanks for looking in, and glad that by build is of interest.
Hello Ray,
Yes I think you are right - I am going crazy. I invested three weeks on the planking of the open platform, and still did not wrap it up, But hopefully this weekend, the planking will be over and done with.
Cheers.
Many thanks for looking in, and glad that by build is of interest.
Hello Ray,
Yes I think you are right - I am going crazy. I invested three weeks on the planking of the open platform, and still did not wrap it up, But hopefully this weekend, the planking will be over and done with.
Cheers.

skyhigh- Best in Show

- Posts : 4654
Join date : 2009-07-30
Age : 63
Location : Qormi, Malta
Paul Salomone wrote:Hello Tiking,
Many thanks for looking in, and glad that by build is of interest.
Hello Ray,
Yes I think you are right - I am going crazy. I invested three weeks on the planking of the open platform, and still did not wrap it up, But hopefully this weekend, the planking will be over and done with.
Cheers.
Barvo Paul ....that's how a devoted modeler should be....

smallia- Gold

- Posts : 670
Join date : 2009-07-21
Age : 60
Location : G'Mangia
Absolutely fabulous mate
steve

Paul Salomone- Gold

- Posts : 655
Join date : 2011-07-08
Age : 59
Location : MANIKATA MALTA
Hi Guys, 
Thanks for your kind comments.
Today i am posting the pictures related to the decking of the open observation platform.
Finally the decking is ready, and applying the stains and washes.


Thanks for your kind comments.
Today i am posting the pictures related to the decking of the open observation platform.
Finally the decking is ready, and applying the stains and washes.


iCocker- Best in Show

- Posts : 3172
Join date : 2009-07-21
Age : 50
Location : Marsascala, Malta
Awesome mate ... what a difference real wood make!
jojjemannen- Admin
- Posts : 430
Join date : 2009-07-29
Age : 46
Location : Getinge
Wow! Amazing work on that model! Love the details.
Keep it up.
/Tiny
Keep it up.
/Tiny

smallia- Gold

- Posts : 670
Join date : 2009-07-21
Age : 60
Location : G'Mangia
Is it ready yet ? No seriously....you've got ba................. !!!
Steve

alexbb- Best in Show

- Posts : 1710
Join date : 2009-07-21
Age : 63
paul i knew id seen this before dont know the scale but one of them could do


these are from accurate armour
hope its not too late now


these are from accurate armour
hope its not too late now

bcauchi- Best in Show

- Posts : 4088
Join date : 2009-07-30
Age : 63
Location : St. Julian's
Prosit Paul, lovely deck.

Paul Salomone- Gold

- Posts : 655
Join date : 2011-07-08
Age : 59
Location : MANIKATA MALTA
Good morning my SSM Brothers, 
Finally, it's back to work again.
As some of you may know, I am now working on the admiral's bridge or as many refer to it as the wheel house. One thing to know, is that the WW2 German warships, had no traditional wheelhouse and helm, as the British had. The German ships were so modern and ahead of time, that the steering controls were a mixture of just a small steering wheel mounted at an angle and two joysticks mounted at either side of the wheel.
To close off the pending platform issue, I have sanded down the original finish, repainted and retreated the balcony platform from scratch.

A side view.

A longitudinal view.

The first attempt. During the Scale modelling weekend, I managed to assemble the primary shape of the admiral's bridge, but wasn't so pleased with the outcome, so I decided to put it aside, and start all over again.

A fresh start. The main pieces required for the job togather with brass "Z" shaped strips.

PLacing the brass strips in place. They overlap the window openings for a reason, as they shall serve as a seating for the clear glass .

The front wall panel in place totather with the first roofing piece.

A front view.

A rear view of the bridge, showing the rear panelling with the access door openings.
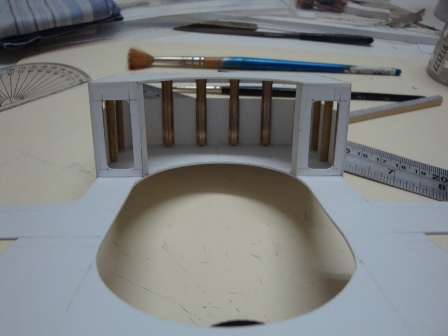
An elevational view showing the putty applied to create the round topping.

A front view.

The central rear side of the bridge, temporarily mounted on a jig, to permint installation and fitting of equipment.

Checking for correct fittness.

A rear view.

The start of the assembly. The support rack for the equipment and the two access door leading to the armoured tower.
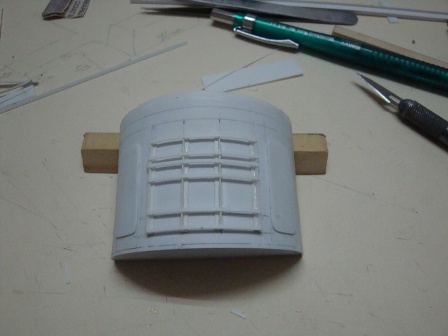
A close up view.

Finally, it's back to work again.
As some of you may know, I am now working on the admiral's bridge or as many refer to it as the wheel house. One thing to know, is that the WW2 German warships, had no traditional wheelhouse and helm, as the British had. The German ships were so modern and ahead of time, that the steering controls were a mixture of just a small steering wheel mounted at an angle and two joysticks mounted at either side of the wheel.
To close off the pending platform issue, I have sanded down the original finish, repainted and retreated the balcony platform from scratch.

A side view.

A longitudinal view.

The first attempt. During the Scale modelling weekend, I managed to assemble the primary shape of the admiral's bridge, but wasn't so pleased with the outcome, so I decided to put it aside, and start all over again.

A fresh start. The main pieces required for the job togather with brass "Z" shaped strips.

PLacing the brass strips in place. They overlap the window openings for a reason, as they shall serve as a seating for the clear glass .

The front wall panel in place totather with the first roofing piece.

A front view.

A rear view of the bridge, showing the rear panelling with the access door openings.

An elevational view showing the putty applied to create the round topping.

A front view.

The central rear side of the bridge, temporarily mounted on a jig, to permint installation and fitting of equipment.

Checking for correct fittness.

A rear view.

The start of the assembly. The support rack for the equipment and the two access door leading to the armoured tower.

A close up view.


Ray- Best in Show

- Posts : 6102
Join date : 2009-07-21
Age : 61
Location : Zurrieq MALTA
Crazy as ever 
Awesome work as always
Awesome work as always
in nannu pec- Best in Show

- Posts : 2019
Join date : 2009-07-23
Age : 76
Location : Qawra Malta
Ray wrote:Crazy as ever
Awesome work as always
I concur....amazing Pawl....prosit !!!!..VIVA IL MARINE SECTION !!!!
mIN KOLLOX GHANDNA....MILL KBIR SA Z-ZGHIR
in nannu

Paul Salomone- Gold

- Posts : 655
Join date : 2011-07-08
Age : 59
Location : MANIKATA MALTA
Thanks guys, 
Tomorrow we shall have the honour to be visited by an old friend of mine who is building the Prinz Eugen, also in 1:72nd scale. He is quite a reserved and a well educated fellow, and I shall try my very best to convince him to enroll.
Tomorrow we shall have the honour to be visited by an old friend of mine who is building the Prinz Eugen, also in 1:72nd scale. He is quite a reserved and a well educated fellow, and I shall try my very best to convince him to enroll.

Paul Salomone- Gold

- Posts : 655
Join date : 2011-07-08
Age : 59
Location : MANIKATA MALTA
Good afternoon my SSM Brothers, 
Today I am posting more pictures related to the construction of the admiral's bridge.
Fitting in the reinforcing beams to the underside of the bridge roofing slab.

Planning out the widow frames to be fitted in the interior side of the bridge.

Cutting out the unwanted part.

Separating the first set.

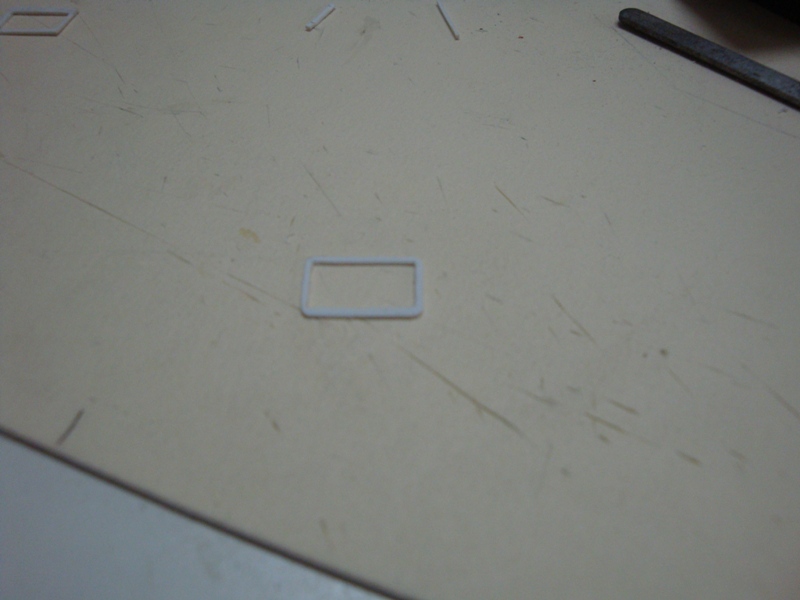
The first frame, awaiting finishing.

The first frame, ready for installation and fitting rivets.
Fitting in the seating panels at the upper side of the bridge, for the seating of the clear glass windows.

A close view.

Fitting in the lower side seating panels.

A close up view.

Shall be posting more next week.
Today I am posting more pictures related to the construction of the admiral's bridge.
Fitting in the reinforcing beams to the underside of the bridge roofing slab.

Planning out the widow frames to be fitted in the interior side of the bridge.

Cutting out the unwanted part.

Separating the first set.

The first frame, awaiting finishing.

The first frame, ready for installation and fitting rivets.

Fitting in the seating panels at the upper side of the bridge, for the seating of the clear glass windows.

A close view.

Fitting in the lower side seating panels.

A close up view.

Shall be posting more next week.


bcauchi- Best in Show

- Posts : 4088
Join date : 2009-07-30
Age : 63
Location : St. Julian's
Paul, your work is simply awesome. The neatness and accuracy are truly amazing. Keep it up, it is one hell of a model, the mother of all models!

skyhigh- Best in Show

- Posts : 4654
Join date : 2009-07-30
Age : 63
Location : Qormi, Malta
bcauchi wrote:Paul, your work is simply awesome. The neatness and accuracy are truly amazing. Keep it up, it is one hell of a model, the mother of all models!
I second this.... welldone Paul...Bravu...

Ray- Best in Show

- Posts : 6102
Join date : 2009-07-21
Age : 61
Location : Zurrieq MALTA
skyhigh wrote:bcauchi wrote:Paul, your work is simply awesome. The neatness and accuracy are truly amazing. Keep it up, it is one hell of a model, the mother of all models!
I second this.... welldone Paul...Bravu...
May I third this guys

Paul Salomone- Gold

- Posts : 655
Join date : 2011-07-08
Age : 59
Location : MANIKATA MALTA
Thank you all you fine fellows, 
Proud to be part of the SSM brotherhood.
Proud to be part of the SSM brotherhood.

in nannu pec- Best in Show

- Posts : 2019
Join date : 2009-07-23
Age : 76
Location : Qawra Malta
Ray wrote:skyhigh wrote:bcauchi wrote:Paul, your work is simply awesome. The neatness and accuracy are truly amazing. Keep it up, it is one hell of a model, the mother of all models!
I second this.... welldone Paul...Bravu...
May I third this guys
I fourth this....stunning work Habib...
In nannu


